If you read the post on the Razor's Edge Motorsports Dual A-Pillar Gauge Pod install, you probably knew what was coming...at least to an extent. The correct answer is Dual AeroForce Interceptors!
You might recall how I have long complained of not having an Oil Pressure Gauge and how the Mopar 10s didn't come from the factory with EVIC, which would have been great for everyone to not only monitor vitals, but also have some fun performance wise.
I learned of the AeroForce Interceptor before I ever had the Mopar 10 and thought they were pretty cool. When I wound up with the M10 and began looking to make up for not having EVIC, I decided to go the route of an Interceptor.
As I checked around to see if anyone had one and how they liked it I learned that no one in my circle of "Challenger" friends had them. I couldn't figure it out. I finally got word that the guys doing aftermarket gauges were usually doing doubles or triples with the old school approach: Oil, Water, and Volts via electric senders. A few opted for Oil and Volts sufficing that the factory "C-H" temp gauge would do.
I checked around and they were all running adapters for the Oil Pressure Gauge. I couldn't believe that the factory cranked out the same car with and without EVIC and that the wiring wasn't there to support oil pressure on non-EVIC cars. Then again, I was told I couldn't swap a "stock cluster" for an "EVIC cluster" without basically rewiring the car (fly a tech in from Detroit and be without the car a few days), so I assumed it must have just been done that way.
A tech heavy source told me that the LX guys ran Interceptors on the 05-07s, but that the 2008+ cars wouldn't spit out oil pressure...bummer.
The way I do things, and how things use to largely be done was simple. The wiring for all the bells and whistles is there: top of the line radio, fog lights, heated seats, sirius etc. If it was an expensive piece, you just left the main run with the appropriate connector and had the consumer pick up the "harness." Simple. Clearly, things have changed.
I was sad to say goodbye to the prospects of the Interceptor, but always hopeful that some other option would come along.
When DiabloSport launched the Trinity I just knew I had found my work around. One single unit to tune, monitor performance, log data, and display PIDs on a custom gauge layout. I shot them an e-mail shortly after launch. They said nope, no oil pressure for a non-EVIC car.
I had a hard time believing we had an oil pressure warning light, but no way to either tap into or read the ECU for the actual pressure...how else does the warning light work?
Then, about a year ago DiabloSport launched the inTune. Sweet! New technology and with data logging touted as one if the inTune's main features I just knew it was the answer. Wrong. I shot an e-mail, several actually, and got the same line as I did with the Trinity. The inTune would not read oil pressure in a non-EVIC car.
I should mention I tried Superchips VIVID when I was also in the market for navigation...Tune, Gauges, Navigation, Android...same thing, no oil pressure.
As fate would have it, a friend informed me that his tech buddy had learned you could simply splice into the signal wire from the warning light and it would also read out pressure on a gauge. That was about where I decided to just go that route. Hard to justify spending the cash for a single oil pressure gauge, a volt gauge, and a water temp gauge when I'd still not have the other features I wanted.
I began (once again) scouring the net for info. The late model Mopar forums (which I just "love" (sarcasm there folks)), had a few threads on this exact issue, but guess what? The question either went unanswered, or the folks that might have been able to provide the solution were banned....Fantastic!
As a last ditch effort, I tried LX Forums hoping some "banned" or open minded LC owners might have migrated over there for the wealth of information. I found a thread just a day or two old with someone asking the same question...he got an answer of "Yes...it will read oil pressure!" Only issue? It was from 07 and back cars and owners. I chimed in, but no one with an 08+ seemed to see the thread.
Between mindslayer and Jim things looked great on the 07 back side of the table. I wanted to get the M10 upgraded for CIC IV and knew the gauges would look great and give me tons of features, even without oil pressure.
I had decided to spring for the gauges and simply wire in Oil Pressure as an analog input on one of the Interceptors. Before doing so I shot some tech questions in to AeroForce. Todd said that he was confident oil pressure would read out on my car, but added he had never had confirmation and didn't have a car to test.
He then went out-of-the-way with an offer I could return the gauges if Oil Pressure didn't read...hard to pass that up.
Thanks to super quick shipping I had my inTune in the weekend before the gauges. I decided to try it out by logging the stock tune and then installing a tune. When I reviewed the file I saw no oil pressure parameter.
When I was leaving work Monday I decided to log again with the inTune. This time I decided to see what all I could log. I skimmed the whole list and never saw oil pressure. Then I decided to check the "Add PID" just for the heck of it. I went to Engine and there was Oil Pressure.
I figured DiabloSport just had it there since it was a parameter that didn't read on this application...I added it and made the log. I got home, pulled up the file, and voila...oil pressure! How did DiaboSport not know this?? My other thought was more important...I figured if the inTune would read Oil Pressure, so would the Interceptor.
Before I even installed the Interceptors, I plugged one in to the OBD port and set it up...I saw Oil Pressure, but knew to temper expectations. Upon firing the car up, there was my steady stream of 56-59 PSI. Once warmed up, the car dropped back down just as it should. I put it in gear and it dropped again. Cycled to Park and gave it some gas...the PSI fluctuated just as it should...I was ecstatic!
It turns out everyone was wrong. There is a ton of misinformation out there not only on forums and among enthusiasts, but among the speed shops, dealers, and factory techs with a performance mind.
I can say definitively that the AeroForce Interceptor (and inTune for that matter) will read Oil Pressure on a non-EVIC car later than 2008. Was the 08 and 09 ECU different, I seriously doubt it. But my 2010 sure as heck has it on board ready to view and I love it.
After 21 months of wanting to monitor Oil Pressure I am finally doing it...and doing it with style!
In addition to Oil Pressure the Dual Interceptors give me pretty much any parameter I would ever want to monitor or simply check from time-to-time. It is incredible!
I basically got the Mopar 10 all the same features as EVIC but for a fraction of the price and in a more user friendly and custom package.
Not only does the Interceptor monitor the basics (Oil Pressure, Water Temp., Volts, Trans. Temp, Oil Temp, etc) you have access to Intake Air Temp., Command Air Fuel, Short Term and Long Term Fuel Trims, Injector Duty Cycle, Ignition Advance, Knock, MDS Status, Current Gear, and a huge list of other elements.
But that's not all! With 2 Analog Inputs on each gauge you have the option of adding 4 more readouts, particularly things like Wideband Air Fuel Ratio or EGT if you go with a Turbo set-up etc.
However, there is still more. Say you want a warning light to come on sooner than the factory...well, with the annunciator you can do that. Oil Pressure below 25...Temp above 225...AFR below 12.5 with x pct throttle etc...it can all be set-up.
Oh and the gauges will read and clear DTCs. Plus say you installed Long Tubes and eliminated the cats...you got your custom tune, but the code is still tripping, record it and clear it! Similarly, if you decide to drop from your R/Ts 20" rims down to an 18" for the track or full time use you can adjust it via the Interceptor...same for changing rear end gears.
Speaking of custom tunes, did you know the Interceptor will record 60 seconds of run time for you to review? Yep, full on-board data logging!
But, perhaps most important for non-EVIC cars is that we get the Performance Functions of EVIC! Horsepower and Torque will both read out on the gauges! The Performance Menu actually logs your 0-60, 1/8, and 1/4 mile times and mph! This is like having the best features of the Trinity without the bulk!
The AeroForce Interceptor is truly a wonder for late model Mopars. The only thing I'm mad about is all the misinformation and the resultant time it took from when I wanted the gauges and when I got them. The peace of mind alone is worth the asking price, but factor in all the parameters you can monitor, the 2 Analog Inputs, ability to read and clear DTCs, bi-directional controls, data logging capabilities, and the Performance functions and you've got one heck of a piece in your car.
Installed in the Razor's Edge Gauge Pod they look right at home in the M10. The blue background really suits the car and I should also mention the custom splash screens, gauge faces, and bezels. You can truly customize your Interceptor and make it just right for your Mopar.
Here are some more pictures and videos:
COMING SOON!
Showing posts with label Dual Guage Pod. Show all posts
Showing posts with label Dual Guage Pod. Show all posts
Wednesday, October 3, 2012

Monday, October 1, 2012
Razor's Edge Dual Gauge Pillar Pod
Well, Phase II of my Fall 2012 upgrades is complete...and looks fantastic! It is kind of a joint operation, but to keep things tidy I'm breaking it down into two segments. You can't really have one without out the other, but this had to be installed prior to the "functional" end of the equation. Let me elaborate...
For those of you that have followed along, you likely recall how I have mourned not having EVIC from the factory. Discounting the performance meter, getting readings on degrees F instead of the alphabetical C and H for temps, and a number of other parameters I would love to monitor has been a hard pill to swallow. My biggest, and most valid, complaint has remained steady: oil pressure.
I know there is a "warning" light in the dash. That doesn't cut it for me. Coming from a background with old Mopars, oil pressure is the MOST CRITICAL vital to monitor and it genuinely bothers me not knowing what it is (even though I can assume it is "safe" with the warning light not on). I am the type that wants to see 50+ PSI on a cold start, 20s at idle, and see how it fluctuates in heat and under heavy acceleration.
Without oil pressure, nothing else really matters. I'll cover that more in the next segment for this upgrade, but let's get down to business. Without EVIC you need an extra gauge to monitor oil pressure.
This is where things get complicated. Where do you mount the gauge? Certainly the chrome cup on the cowl is not what I have in mind for the Mopar 10....although if this was a 70 Challenger I might go that route.
A recent introduction is the "air vent pod." This basically plugs in place of your LH Dash Vent and has the louvers around a 2 1/6" Gauge Pod. Uh, no thanks. This isn't horrible (and we know the gauge would stay cool in the summer, lol), but this is just too mustang for me. Just how I still associate the "flowmaster sound" with fox-bodies and chevy trucks, I can't imagine liking this set-up.
A better option is the overhead console pod. You can source single or dual gauge pods to plug in place of the "Sunglass Holder" in your overhead console. I like this better than the vent pod, but it isn't my style. This route is not playing into my driving style, nor my curiosity and desire to monitor engine parameters past what the factory gave us (fuel, mph, rpm, and C-H). The big perk for those that do like this route is you are not loosing out on much. Unless you wear prescription lenses while driving, the "sunglass holder" probably will never house anything. Straws, chap stick, a pen...I don't know what you might do with it, but for me it is just a flip down compartment my sunglasses don't fit in...If you use the glass holder, you probably don't want to pull it and replace it with a gauge pod. If you don't need it and like that location you can have a single or dual gauge pod take its place. If you want to go that route, check out this article where Brian from the Mopar 10 Registry installed one in his Challenger: )
The next option is a dash pod. I'll be honest here and say this isn't a horrible option, but how you mount it is. Not many of us are gun-ho on cutting a hole in the dash to run wires and cinch down a gauge pod. This also reminds me of mustangs, but more so the 94-04 era. I've seen several people go this route and report back they were upset that it didn't "seal" to the dash. Take something objectionable to begin with and sprinkle in some poor fitment and you've got a pass on my end.
The last remaining option is to go with an A-pillar setup. That is just what I chose for the Mopar 10.
The A-Pillar is the best looking option in my opinion, is the most versatile, and perhaps most importantly it fits my driving style the best. I spend most of my time looking out the windshield so having gauges displayed on the A-Pillar just makes sense.
When I say it is the most versatile I mean it. The Dash Vent is limited to a single gauge (I guess if you want to get weird and run info thru a passenger you could mount 4 of them), the overhead console is limited to 2 maximum, and I believe the dash pod is limited to 2 as well.
If you really have a lot to monitor you can add 3 gauges by way of the Triple Gauge Pillar Pod.
Mopar had orginally planned to launch this as part of their performance catalog of parts for the Challenger. I've been told they scrapped it when the air bag became an issue. Fortunately for all of us looking to add gauges, Razors Edge stepped up to the plate and delivered!
{Enter the content you have been waiting for!}
Razor's Edge saw the need for this product and worked around the "air bag" issue by using factory A-pillars. These factory pieces are ordered in, drilled for wiring, modified with glass gauge pods, and then wrapped in black grill clothe that closely resembles both the headliner and in my opinion door pockets.
Being a factory piece, these are of great quality. Razor's Edge grafts the gauge pods on at a very friendly orientation to the driver. From certain angles you would be hard pressed to know the gauges were even on the A-Pillar...it makes for a very clean installation.
I know what some of you are thinking...black? They used black grill cloth? Isn't the factory piece gray? Fear not for you are correct. I actually like the factory color, that said your concern is likely not because you fear the contrast between the A-Pillar and dash ,but rather have concern over the OTHER A-pillar.
I will say this...I honestly think that short of having someone critique your car, or driving around with someone that likes to talk about funerals, famine, and disease on your way to a football game and concert, no one would notice. If you are particular, it might bother you. If you're in the shade, or a parking garage...good luck telling the difference in the stock piece and the modified pillar. Now that said, if you are out in full sun it would be a bit more noticeable, but this isn't a huge contrast.
That said, if you are like me, just knowing it was different might cost you some sleep at night, so once again Razor's Edge came through with a great piece. To remedy this scenario they ordered in a factory RH A-Pillar and simply glue black grill cloth over it. Chrysler must love this shop...
The result is a perfectly matched pair! You can now add gauges and keep the interior show worthy while silencing critics.
These are high quality pieces that are reasonably prices and coupled with gauges, give you a whole new experience in the cockpit.
Let's take a look at the product and install:
VIDEO COMING SOON!!
Factory A-Pillar Removal (Same for both sides)
1. Disconnect the Negative Terminal from Your Battery
I don't think you'd have an airbag issue, but it is better to err on the side of caution as it is easy to slip and trip something.
2. Lift up on the trim piece between the Kick Panel and A-Pillar
I like to start at the bottom. There are two clips, the top is in a bit more securely.

You can see the clips/slots here:

3. Now Grab the A-Pillar near the top at the headliner and shimmy it loose. You will likely have the plastic pin (seen below) pop and the metal clip remain in the car. If you can reach it, push in the plastic detent and slide it to the middle, then depress it again and free it from the metal clip.
If you can not reach the plastic detent, simply pull outward to release the bottom clip and then release the top clip as described above:

4. Simply lift the locators (plastic tabs at the bottom of the A-Pillar) away from their recesses in the dash and the A-Pillar is out. You aren't looking at but about 5 minutes to do this process on both sides.
Now let's prepare to install the Razor's Edge A-Pillars.
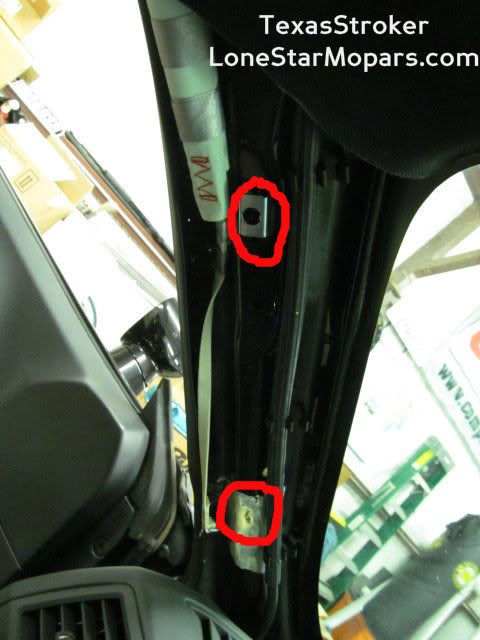
*This is a big tip from my install. Instead of trying to get the metal clip out of the body of the car, leave it in place! We can simply remove the same clip from the Razor's Edge A-Pillars and then use the factory clip to secure the new A-Pillars.
The metal clip I am referring to is the top circle in the picture below. The bottom circle is where the other clip is snapped in place:

1. Place the A-Pillar on a soft surface and source a flat blade screwdriver or pry tool. The clip doesn't require enough pressure to have the screwdriver mar the plastic:

2. In fact, it requires no leverage! Simply slide the flat end forward and the plastic pin will be released from the clip:


3. Now we just need to remove the metal clip from the plastic tab. We are going to reuse the metal clips that we left in the car. Trust me, this is the best way to do things. It will save you a lot of time.

That piece of plastic that raises up is what I call the "detent." It looks similar to what you see on electrical connectors that clip together. Simply press down on it and push it towards the center of the metal clip:

See how the tab moved? Depress the plastic detent again and you will free the plastic portion from the metal clip. That is all there is to it.
Keep the metal clip and reinstall it on the factory A-Pillars when you have them removed...This will ensure you do not loose it...and if you do, you have a bigger problem anyway.
Now, you are ready to install the Razor's Edge A-Pillar Gauge Pod and/or Matching Passenger Cover.
1. Slide the plastic tab with the detent into the metal clip you left in the car. Make sure to insert it all the way (ie the first click will be when you hit the center of the clip and the second will be fully installed). After that, line up the bottom tabs of the A-Pillar with their respective recesses in the dash.
2. Use the locating pin on the A-Pillar (large plastic dowel) and find the hole for it near the metal clip.
3. Get it in place and proceed to press the ball end of the of the plastic hanger into the plastic tab + metal clip combo. No good way to explain that in writing...
4. You should now have the A-Pillar snug up top...Slide down the side and make sure to get the rubber trim on the window side on top of the A-Pillar. This will help you snap the lower pin in place much easier.
5. Now apply firm pressure along the area where the bottom clip is...When you hear it pop, you are pretty well done.
6. Apply pressure all the way along the A-Pillar and make sure it is snug, just like the factory piece. Double check to make sure the bottom end is recessed in the dash and that you have the top end over the headliner. Lastly, make sure the rubber is overlapping the A-Pillar and your install is complete.
If you have read all that and don't actually have the A-Pillars from Razor's Edge, I assume that is because you are still debating this upgrade, or can't believe someone did all this without providing a nice color comparison. Fear not...I am with you 100%. For those of you concerned with the color change, here you go:

Left to Right: Razor's Edge LH Dual Gauge Pillar Pod, Factory LH, Factory RH, Razor's Edge RH
Kind of sloppy, but you get the idea. The red "R" indicates a Razor's Edge piece while the white "F" indicates the Factory A-Pillar.
More detail you say? No problem:

This is just as the captions indicate...Modified Razor's Edge Dual Gauge Pillar Pod beside the Factory LH A-Pillar.

Again, pretty straight forward. To the left we have the factory RH A-Pillar and on the right we have the "matched" Razor's Edge RH A-Pillar.
What? You care so much about your late model Mopar you want to see how they look with the car? As you wish:

I felt like the door actually gave the best showcase for hte color change. To me the factory A-Pillar is more like the plastic you see on the door panel (top piece with lock know and lower half with speaker grille). The door's inset area is kind of a darker color than the slate gray in my opinion and I think the Razor's Edge pieces matches it better.

You should see more contrast between the factory A-Pillar and the door's inset than you did with the Razor's Edge Piece. Alternatively, the factory A-Pillar is dead on with the plastic on the door.
Going with the side-by-side comparison photos from earlier, it is easy to see that the Razor's Edge A-Pillars and the black grill clothe are in deed darker. But here is the catch...
Factory A-Pillar=Matches Plastic Door Panel and Dash
Razor's Edge A-Pillar=Matches Door Inset and Headliner
Take your pick as neither is 100% uniform.
I've said it before and I'll say it again. With the Challenger's interior being so dark, you honestly can not tell the difference in the stock A-Pillar and the Razor's Edge A-Pillars in overcast conditions, a shop, a parking garage, under a shade tree etc.
In full sun with the sunroof open, yeah...you probably can.
I truly believe you could run the modified LH Pillar for gauges and keep the stock RH Pillar and never get caught...unless you are dealing with someone who is nitpicking your entire car. That said, I sprung for the matching passenger side and couldn't be happier.
The installation of the Razor's Edge Dual Gauge Pillar Pod and Matching Passenger A-Pillar was truly painless and took only a few minutes. The placement of the gauges and viewing angle is perfect for me and when combined with gauges, it makes for a total interior transformation.
The Gauge Pods are integrated so smoothly, only the most keen eyes will notice this upgrade. Those looking enough to notice it are probably wanting to do the same.
If you have an eye for mods, you can see the gauges from both windows and trained eyes can catch the telling bulge from a front vantage.
At night the glow from the gauges serves as a warning sign to would be contenders that they are dealing with a modified Mopar and should think twice before getting embarrassed.
All-in-all, if you have the need for gauges, this is the way to go in my opinion. It is a slick install and blends custom and function flawlessly.
You can pick up your Razor's Edge A-Pillar Gauge Pods and the Matching Passenger Side Cover here:
http://www.razorsedgemotorsports.com/category_s/220.htm
For those of you that have followed along, you likely recall how I have mourned not having EVIC from the factory. Discounting the performance meter, getting readings on degrees F instead of the alphabetical C and H for temps, and a number of other parameters I would love to monitor has been a hard pill to swallow. My biggest, and most valid, complaint has remained steady: oil pressure.
I know there is a "warning" light in the dash. That doesn't cut it for me. Coming from a background with old Mopars, oil pressure is the MOST CRITICAL vital to monitor and it genuinely bothers me not knowing what it is (even though I can assume it is "safe" with the warning light not on). I am the type that wants to see 50+ PSI on a cold start, 20s at idle, and see how it fluctuates in heat and under heavy acceleration.
Without oil pressure, nothing else really matters. I'll cover that more in the next segment for this upgrade, but let's get down to business. Without EVIC you need an extra gauge to monitor oil pressure.
This is where things get complicated. Where do you mount the gauge? Certainly the chrome cup on the cowl is not what I have in mind for the Mopar 10....although if this was a 70 Challenger I might go that route.
A recent introduction is the "air vent pod." This basically plugs in place of your LH Dash Vent and has the louvers around a 2 1/6" Gauge Pod. Uh, no thanks. This isn't horrible (and we know the gauge would stay cool in the summer, lol), but this is just too mustang for me. Just how I still associate the "flowmaster sound" with fox-bodies and chevy trucks, I can't imagine liking this set-up.
A better option is the overhead console pod. You can source single or dual gauge pods to plug in place of the "Sunglass Holder" in your overhead console. I like this better than the vent pod, but it isn't my style. This route is not playing into my driving style, nor my curiosity and desire to monitor engine parameters past what the factory gave us (fuel, mph, rpm, and C-H). The big perk for those that do like this route is you are not loosing out on much. Unless you wear prescription lenses while driving, the "sunglass holder" probably will never house anything. Straws, chap stick, a pen...I don't know what you might do with it, but for me it is just a flip down compartment my sunglasses don't fit in...If you use the glass holder, you probably don't want to pull it and replace it with a gauge pod. If you don't need it and like that location you can have a single or dual gauge pod take its place. If you want to go that route, check out this article where Brian from the Mopar 10 Registry installed one in his Challenger: )
The next option is a dash pod. I'll be honest here and say this isn't a horrible option, but how you mount it is. Not many of us are gun-ho on cutting a hole in the dash to run wires and cinch down a gauge pod. This also reminds me of mustangs, but more so the 94-04 era. I've seen several people go this route and report back they were upset that it didn't "seal" to the dash. Take something objectionable to begin with and sprinkle in some poor fitment and you've got a pass on my end.
The last remaining option is to go with an A-pillar setup. That is just what I chose for the Mopar 10.
The A-Pillar is the best looking option in my opinion, is the most versatile, and perhaps most importantly it fits my driving style the best. I spend most of my time looking out the windshield so having gauges displayed on the A-Pillar just makes sense.
When I say it is the most versatile I mean it. The Dash Vent is limited to a single gauge (I guess if you want to get weird and run info thru a passenger you could mount 4 of them), the overhead console is limited to 2 maximum, and I believe the dash pod is limited to 2 as well.
If you really have a lot to monitor you can add 3 gauges by way of the Triple Gauge Pillar Pod.
Mopar had orginally planned to launch this as part of their performance catalog of parts for the Challenger. I've been told they scrapped it when the air bag became an issue. Fortunately for all of us looking to add gauges, Razors Edge stepped up to the plate and delivered!
{Enter the content you have been waiting for!}
Razor's Edge saw the need for this product and worked around the "air bag" issue by using factory A-pillars. These factory pieces are ordered in, drilled for wiring, modified with glass gauge pods, and then wrapped in black grill clothe that closely resembles both the headliner and in my opinion door pockets.
Being a factory piece, these are of great quality. Razor's Edge grafts the gauge pods on at a very friendly orientation to the driver. From certain angles you would be hard pressed to know the gauges were even on the A-Pillar...it makes for a very clean installation.
I know what some of you are thinking...black? They used black grill cloth? Isn't the factory piece gray? Fear not for you are correct. I actually like the factory color, that said your concern is likely not because you fear the contrast between the A-Pillar and dash ,but rather have concern over the OTHER A-pillar.
I will say this...I honestly think that short of having someone critique your car, or driving around with someone that likes to talk about funerals, famine, and disease on your way to a football game and concert, no one would notice. If you are particular, it might bother you. If you're in the shade, or a parking garage...good luck telling the difference in the stock piece and the modified pillar. Now that said, if you are out in full sun it would be a bit more noticeable, but this isn't a huge contrast.
That said, if you are like me, just knowing it was different might cost you some sleep at night, so once again Razor's Edge came through with a great piece. To remedy this scenario they ordered in a factory RH A-Pillar and simply glue black grill cloth over it. Chrysler must love this shop...
The result is a perfectly matched pair! You can now add gauges and keep the interior show worthy while silencing critics.
These are high quality pieces that are reasonably prices and coupled with gauges, give you a whole new experience in the cockpit.
Let's take a look at the product and install:
VIDEO COMING SOON!!
Factory A-Pillar Removal (Same for both sides)
1. Disconnect the Negative Terminal from Your Battery
I don't think you'd have an airbag issue, but it is better to err on the side of caution as it is easy to slip and trip something.
2. Lift up on the trim piece between the Kick Panel and A-Pillar
I like to start at the bottom. There are two clips, the top is in a bit more securely.
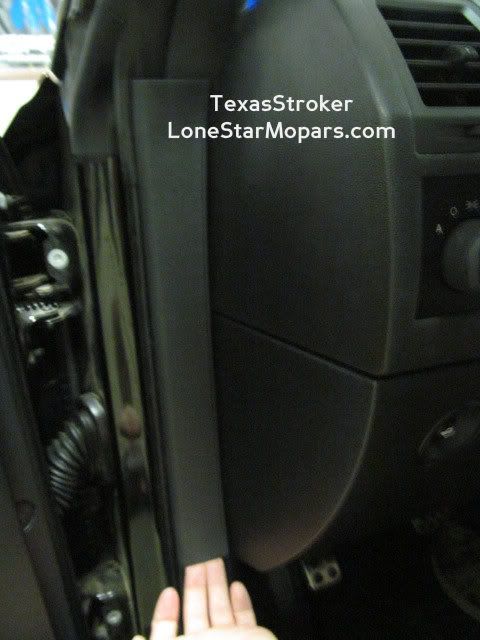
You can see the clips/slots here:
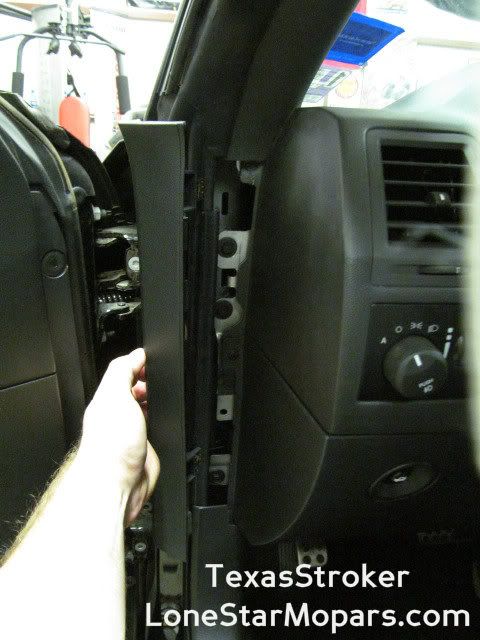
3. Now Grab the A-Pillar near the top at the headliner and shimmy it loose. You will likely have the plastic pin (seen below) pop and the metal clip remain in the car. If you can reach it, push in the plastic detent and slide it to the middle, then depress it again and free it from the metal clip.
If you can not reach the plastic detent, simply pull outward to release the bottom clip and then release the top clip as described above:
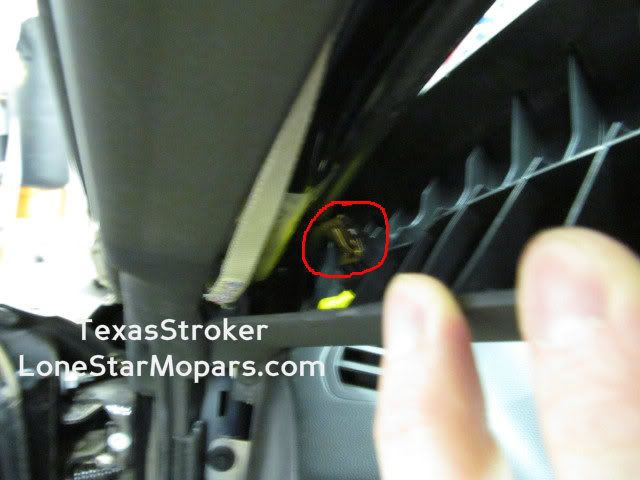
4. Simply lift the locators (plastic tabs at the bottom of the A-Pillar) away from their recesses in the dash and the A-Pillar is out. You aren't looking at but about 5 minutes to do this process on both sides.
Now let's prepare to install the Razor's Edge A-Pillars.
*This is a big tip from my install. Instead of trying to get the metal clip out of the body of the car, leave it in place! We can simply remove the same clip from the Razor's Edge A-Pillars and then use the factory clip to secure the new A-Pillars.
The metal clip I am referring to is the top circle in the picture below. The bottom circle is where the other clip is snapped in place:
1. Place the A-Pillar on a soft surface and source a flat blade screwdriver or pry tool. The clip doesn't require enough pressure to have the screwdriver mar the plastic:
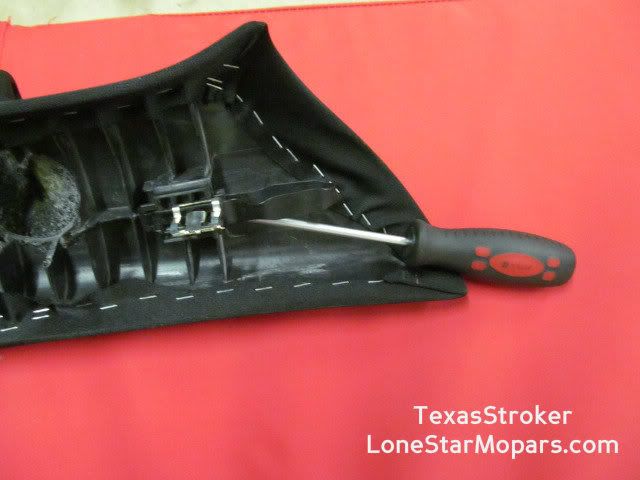
2. In fact, it requires no leverage! Simply slide the flat end forward and the plastic pin will be released from the clip:
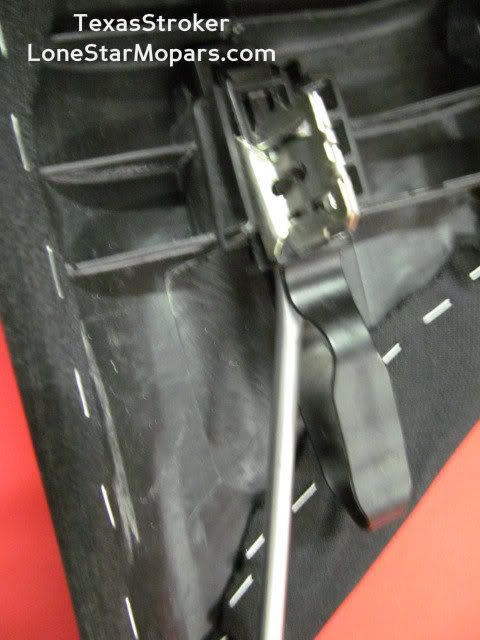
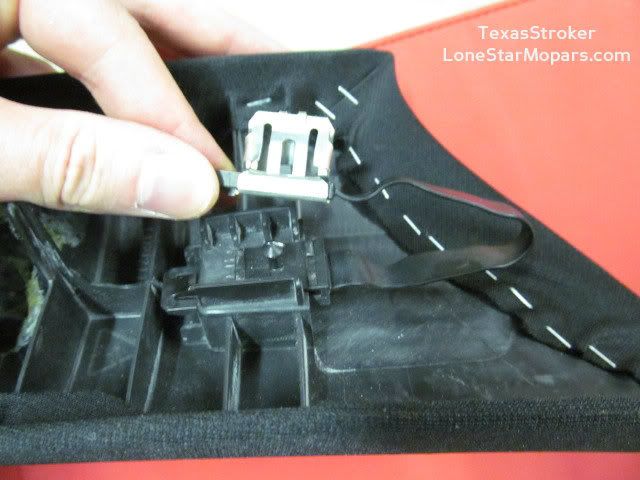
3. Now we just need to remove the metal clip from the plastic tab. We are going to reuse the metal clips that we left in the car. Trust me, this is the best way to do things. It will save you a lot of time.
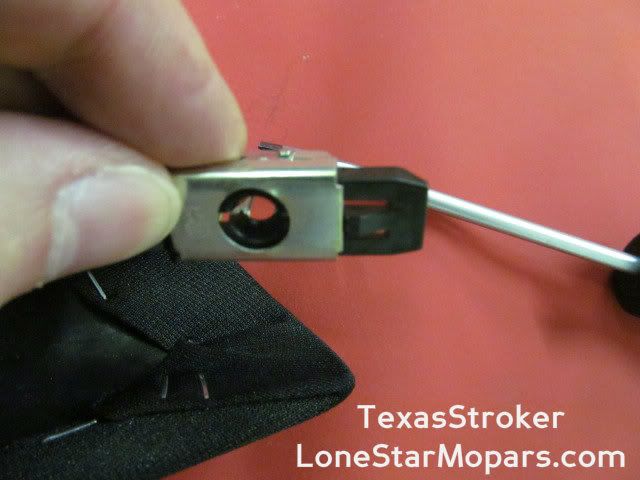
That piece of plastic that raises up is what I call the "detent." It looks similar to what you see on electrical connectors that clip together. Simply press down on it and push it towards the center of the metal clip:
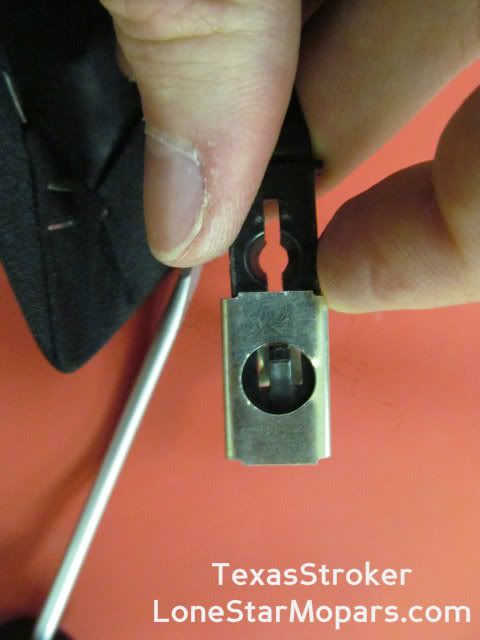
See how the tab moved? Depress the plastic detent again and you will free the plastic portion from the metal clip. That is all there is to it.
Keep the metal clip and reinstall it on the factory A-Pillars when you have them removed...This will ensure you do not loose it...and if you do, you have a bigger problem anyway.
Now, you are ready to install the Razor's Edge A-Pillar Gauge Pod and/or Matching Passenger Cover.
1. Slide the plastic tab with the detent into the metal clip you left in the car. Make sure to insert it all the way (ie the first click will be when you hit the center of the clip and the second will be fully installed). After that, line up the bottom tabs of the A-Pillar with their respective recesses in the dash.
2. Use the locating pin on the A-Pillar (large plastic dowel) and find the hole for it near the metal clip.
3. Get it in place and proceed to press the ball end of the of the plastic hanger into the plastic tab + metal clip combo. No good way to explain that in writing...
4. You should now have the A-Pillar snug up top...Slide down the side and make sure to get the rubber trim on the window side on top of the A-Pillar. This will help you snap the lower pin in place much easier.
5. Now apply firm pressure along the area where the bottom clip is...When you hear it pop, you are pretty well done.
6. Apply pressure all the way along the A-Pillar and make sure it is snug, just like the factory piece. Double check to make sure the bottom end is recessed in the dash and that you have the top end over the headliner. Lastly, make sure the rubber is overlapping the A-Pillar and your install is complete.
If you have read all that and don't actually have the A-Pillars from Razor's Edge, I assume that is because you are still debating this upgrade, or can't believe someone did all this without providing a nice color comparison. Fear not...I am with you 100%. For those of you concerned with the color change, here you go:
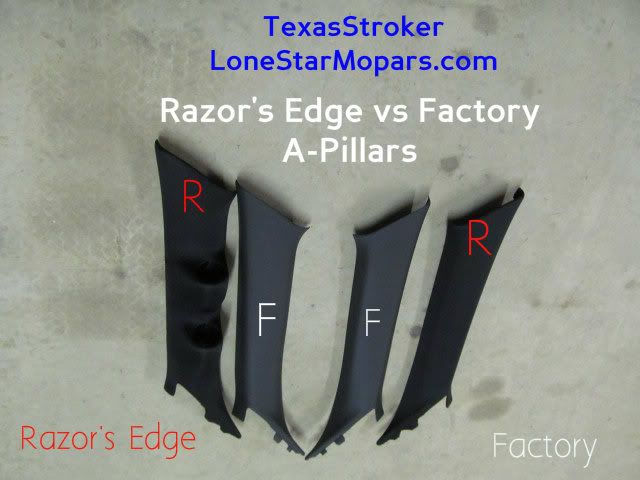
Left to Right: Razor's Edge LH Dual Gauge Pillar Pod, Factory LH, Factory RH, Razor's Edge RH
Kind of sloppy, but you get the idea. The red "R" indicates a Razor's Edge piece while the white "F" indicates the Factory A-Pillar.
More detail you say? No problem:
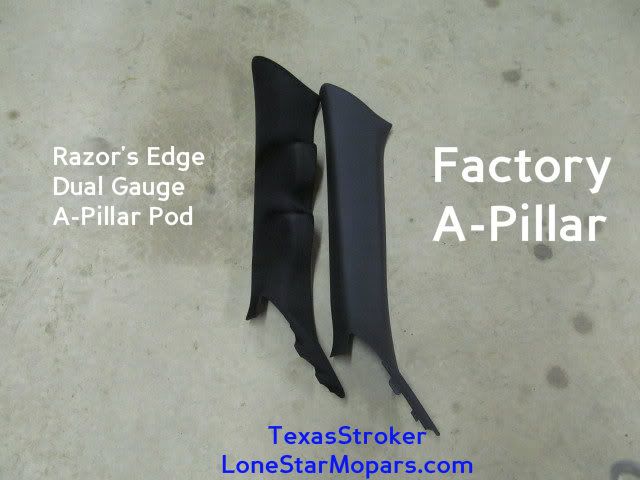
This is just as the captions indicate...Modified Razor's Edge Dual Gauge Pillar Pod beside the Factory LH A-Pillar.
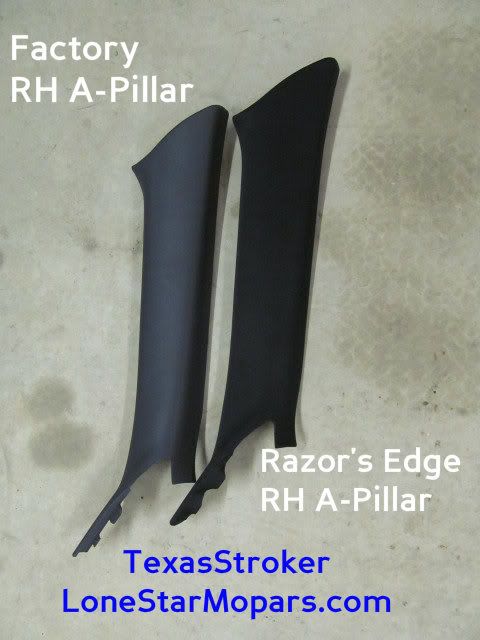
Again, pretty straight forward. To the left we have the factory RH A-Pillar and on the right we have the "matched" Razor's Edge RH A-Pillar.
What? You care so much about your late model Mopar you want to see how they look with the car? As you wish:
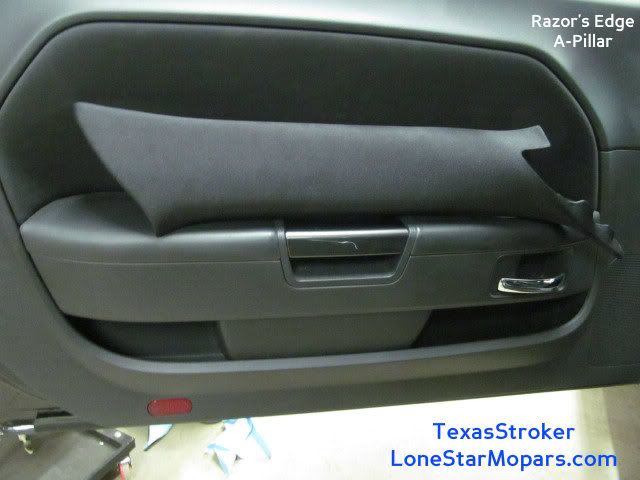
I felt like the door actually gave the best showcase for hte color change. To me the factory A-Pillar is more like the plastic you see on the door panel (top piece with lock know and lower half with speaker grille). The door's inset area is kind of a darker color than the slate gray in my opinion and I think the Razor's Edge pieces matches it better.
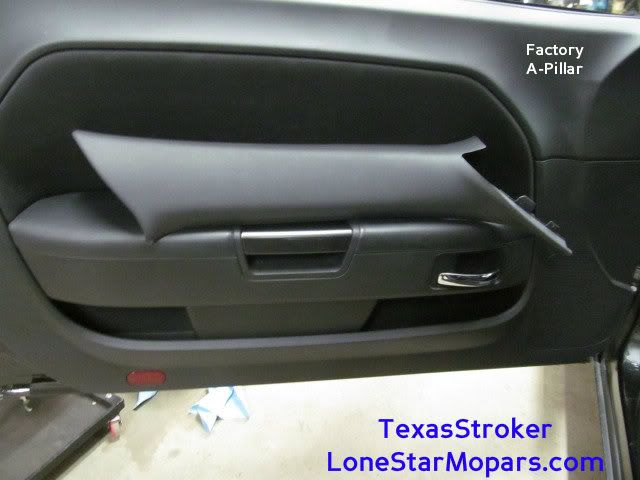
You should see more contrast between the factory A-Pillar and the door's inset than you did with the Razor's Edge Piece. Alternatively, the factory A-Pillar is dead on with the plastic on the door.
Going with the side-by-side comparison photos from earlier, it is easy to see that the Razor's Edge A-Pillars and the black grill clothe are in deed darker. But here is the catch...
Factory A-Pillar=Matches Plastic Door Panel and Dash
Razor's Edge A-Pillar=Matches Door Inset and Headliner
Take your pick as neither is 100% uniform.
I've said it before and I'll say it again. With the Challenger's interior being so dark, you honestly can not tell the difference in the stock A-Pillar and the Razor's Edge A-Pillars in overcast conditions, a shop, a parking garage, under a shade tree etc.
In full sun with the sunroof open, yeah...you probably can.
I truly believe you could run the modified LH Pillar for gauges and keep the stock RH Pillar and never get caught...unless you are dealing with someone who is nitpicking your entire car. That said, I sprung for the matching passenger side and couldn't be happier.
The installation of the Razor's Edge Dual Gauge Pillar Pod and Matching Passenger A-Pillar was truly painless and took only a few minutes. The placement of the gauges and viewing angle is perfect for me and when combined with gauges, it makes for a total interior transformation.
The Gauge Pods are integrated so smoothly, only the most keen eyes will notice this upgrade. Those looking enough to notice it are probably wanting to do the same.
If you have an eye for mods, you can see the gauges from both windows and trained eyes can catch the telling bulge from a front vantage.
At night the glow from the gauges serves as a warning sign to would be contenders that they are dealing with a modified Mopar and should think twice before getting embarrassed.
All-in-all, if you have the need for gauges, this is the way to go in my opinion. It is a slick install and blends custom and function flawlessly.
You can pick up your Razor's Edge A-Pillar Gauge Pods and the Matching Passenger Side Cover here:
http://www.razorsedgemotorsports.com/category_s/220.htm
Subscribe to:
Posts (Atom)