Showing posts with label HEMI. Show all posts

Sunday, April 21, 2013

Cloud 10, Phase 4: Blue LED Trunk Lighting

Long time no post...I am still back logged on milestones the M10 has hit and of course, the subtle customizations and performance mods I have made, but those will come in due time.

Cloud 10, Phase 4: Blue LED Trunk Lighting

So, first let me say, that due to things mentioned in the previous post, "Cloud 10" has yet to fully be documented or explained here...I plan on going back and creating new posts to cover that.  Here are some basics:

What is Cloud 10?

Cloud 10 is the Project Name I gave to lighting up the M10.  You often hear the old adage about being on "Cloud 9" right?  Well, Cloud 10 takes that and 1-ups it...in true Mopar fashion.

Since my car has the blue stripe...and black and blue is one of my favorite color combos, I chose to accent the M10's factory appeal with some subtle, custom lighting.  Phase 1 was simply swapping over to Blue LED Bulbs.  Phase 2 was the sweet Blue LED Footwell Lights.  Phase 3, which I had beautifully documented, but put off for other things, was underbody lighting.  Phase 4 kind of ran out of time before the big Midwest Meet and believe it or not, here on Saturday, April 20th, 2013 I finally got to finish it!

But wait, "You already had blue LED lights in the trunk...didn't you?"  Yes I did.  "And I thought you had an accent light on the Alpine Amplifier?"  Correct once more!  "So, what did you light up?  There is nothing left to light back there."  I would agree, until I experimented.

Way back when I wired in the accent light for the amp (which was great btw)...did it's job casting a nice, blue light on the ol' Alpine:
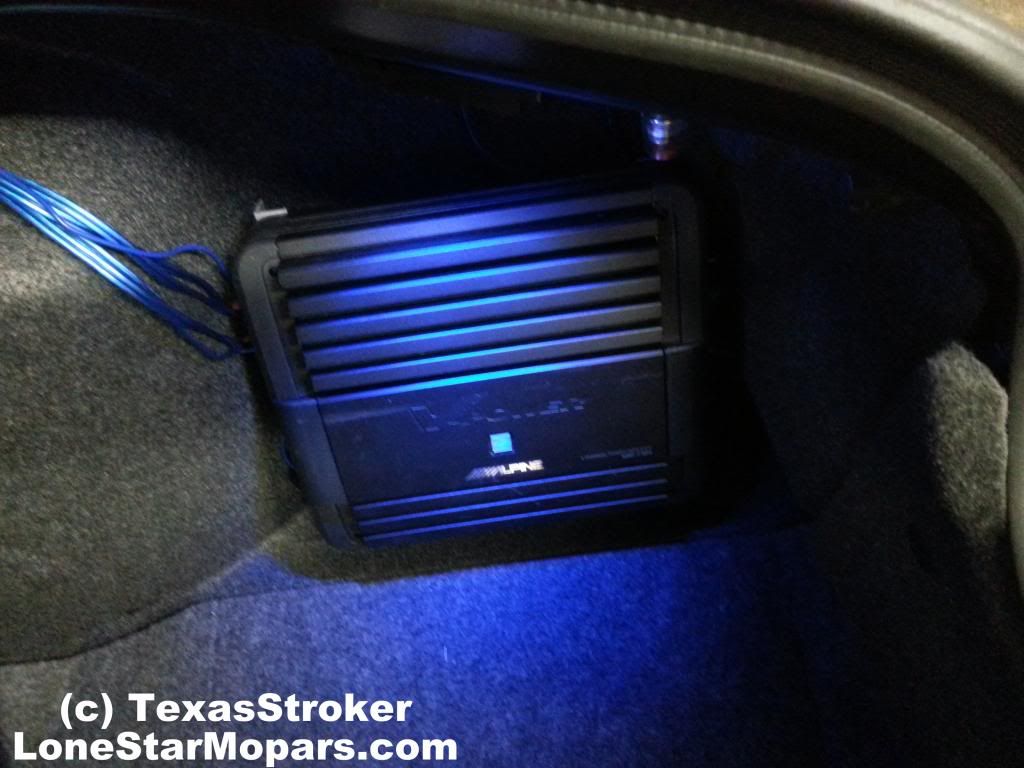


I went ahead and ran some extra wires and pre-terminated them for future expansion...I'll be honest, even though it took me 9 months to take advantage of it, had I not pre-wired things way back last summer, I wouldn't be making this blog post right now...the back of the Challenger would be torn apart and I'd be needing another few hours to wrap things up....

As is, I literally whipped this out in 20 minutes...granted I then spent about 40 on the switch, but a lot of that has to do with the horrible contortion job you have to do to bend over in the trunk...and my insistence on a "dual mode," which we will cover here shortly.

Now, you are still probably wondering what else I could possibly light up...factory center light shines on the Mopar Rear Strut Tower Brace and the Amp is lit up and it seemingly casts a bit more light to help out in the dim trunk...That is correct.

Here is the thing...any custom light, factory light, or ducktaped flashlight really doesn't do a good job illuminating the trunk...These are big cars...the location of the factory light is a limiting factor.  You get poor illumination behind the beam angle, and due to the position it is set, the beam doesn't really even do a good job pointing light forward where you would most want it (forward, center).  Take a glance left or right and you might be surprised those dark caverns are actually the right and left most reaches of your trunk.  Try setting a cell phone down in the trunk, shutting the lid, and popping it to tell a buddy to go find your phone in the trunk...10:1 he will use his phone to call yours after a few minutes of pawing around blindly.

While you can kind of see, it is by no means as good as it could be...and it certainly leaves plenty of room for  improvement...and that is what we like to do!

So, enter Phase 4's concept...trace the rim of the trunk with lights and see how it looks.

Here is the thing though...and some folks may be offended.  I can't stand seeing a light source.  It takes all the trick and custom out of it.  I'm in a room with can lights...I look up and see the can, bulb, and light...then spots for looking at it.  Think if the ceiling in your office was a pane that looked like a solid ceiling, but emitted light when the switch was on...People would think it was pretty cool right?  You bet they would.

I have a picture from the Midwest Meet where a young kid got down on his belly to try and see how the M10 was putting blue light on the pavement.  By hiding the light source, things just look better.  I know plenty of people that will see this post, run to AutoZone, pick up a 12" stick of LED or Neon and tape it to their trunk liner...while you will have cool lighting, you'll see the source...That bothers me.  I see it at shows where guys just plaster LED strips, Neon tubes, and cathodes from the engine bay, to the dash, to the trunk...seeing the light source kills it for me.  Sometimes you can't fully hide it, but you can always do better than making it like an old bulb & socket.

I tested things out, and was impressed with what my little 10" test strip lit up (times like these you realize how lackluster factory appointments can be).  My issue was I was pretty content with my center and accent light set-up...I was afraid based on the test strip that I was about to light up a small town square.  That said, I knew I wanted that look...so I decided to plump a switch in to let me go into "dual mode."

Enacting Phase 4 of Cloud 10

That said, I suppose before we cover that we need to see just what I did...

Step 1: Clean & Prep (Assuming You are Pre-Wired)

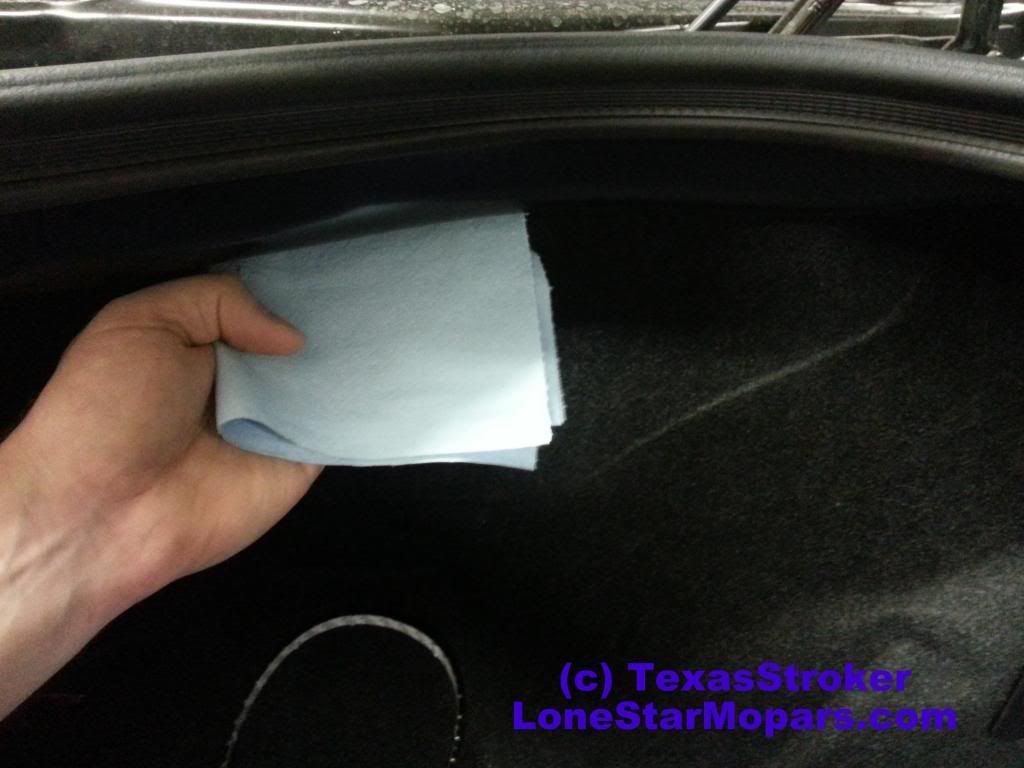
First thing first, when you are going to be adhering or mounting anything, always clean and prep the surface...I like to get the dust off with a shop towel and then turn it inside out with a little Prep All (wax and grease remover).  If you detail your car and slather on wax, or more likely have traces of Armor All etc on the mounting points, clean it up!  If you are going to do something, do it right:

Step 2: Wiring Diagram, Test Fit, Wire-It-Up!

Next up, you need to trace your wiring out and ensure you have enough slack for where you plan to mate the  leads and lighting...In my case with the switch you need the following:

-Earth Ground
+Supply Volts
*On Accessory

To break that down you basically need to tie the switch in with the factory ground...Then feed the hot lead to the "Supply Volts," and lastly run the power wire from your light source to the "On Accessory."  Most switches have a similar layout...you can usually invert 2 of the positions, just make note of "On" and "Off" if the switch is labeled.

I usually go into great detail on the tech end, but I was in the shop, on limited time, and only had my cell phone handy...Plus, until I go back and see what I mapped out, I would have needed a lot of time to pin down the factory wiring colors given I pre-wired this back last summer.

Since I did the switch, I had to mount it...I picked a really trick location.  I debated showing it, but I think I'll keep it low key for now...Can't spill all the secrets...

Step 3: Test Your Work

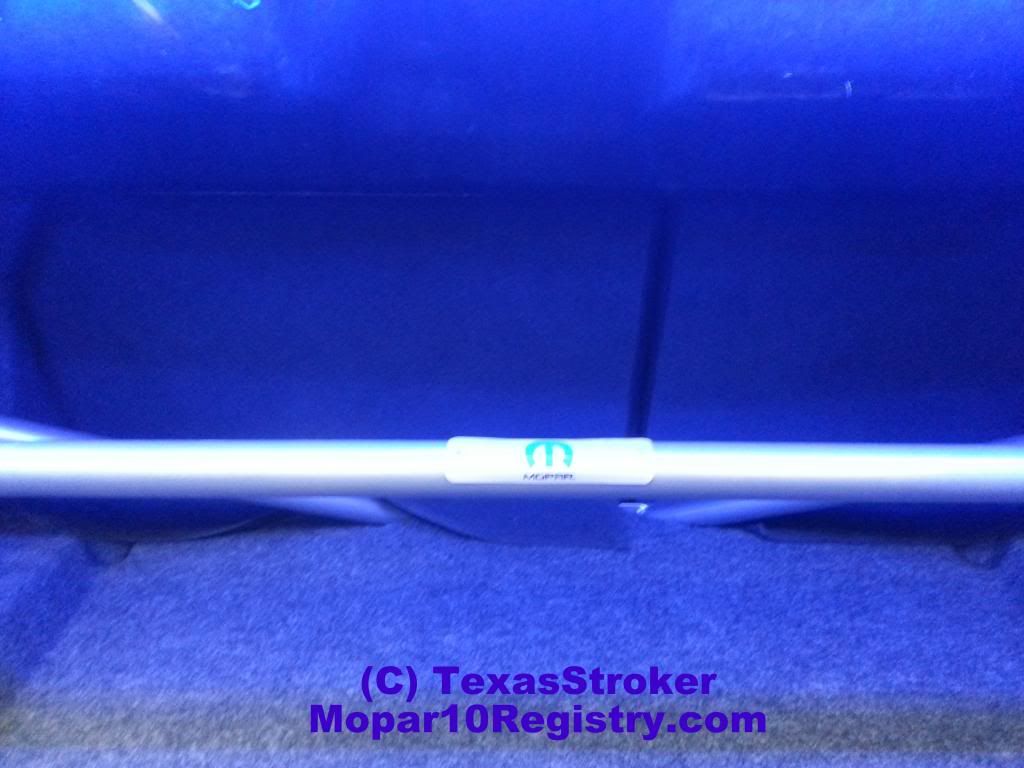
That said, here is what we come out with in the test run (note these pics are with the shop lights on):

Center View, Shop Lights On
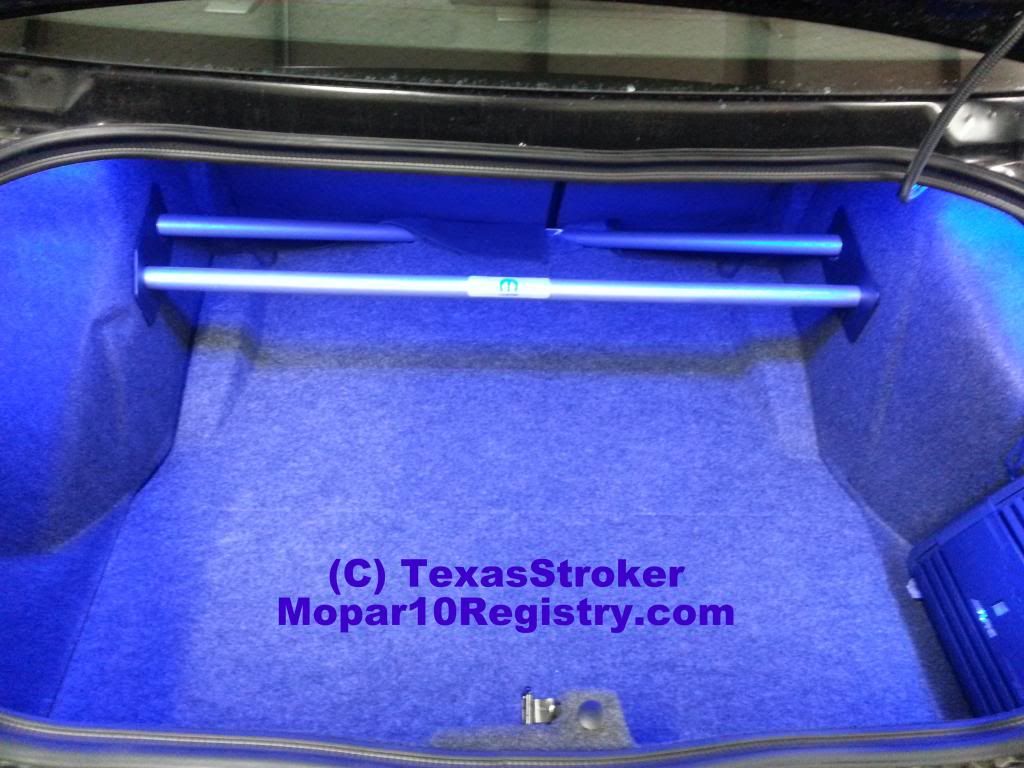
Center View, Close Up, Shop Lights On
Center View, Shop Lights Out
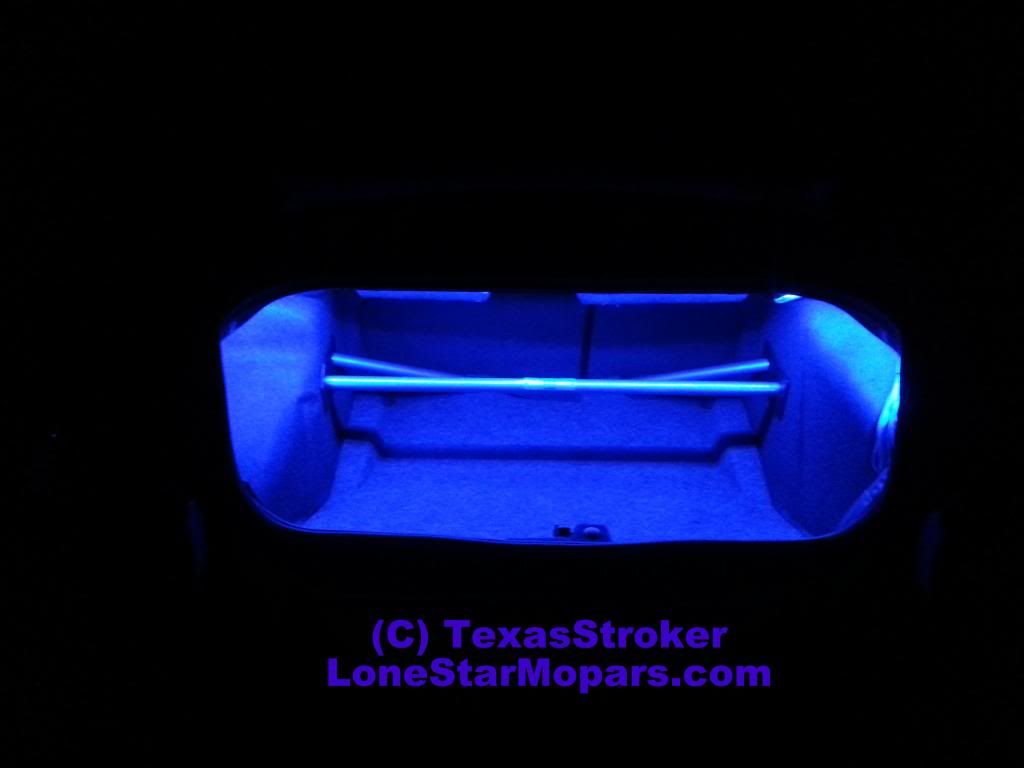
Center View, Closer-In, Shop Lights Out
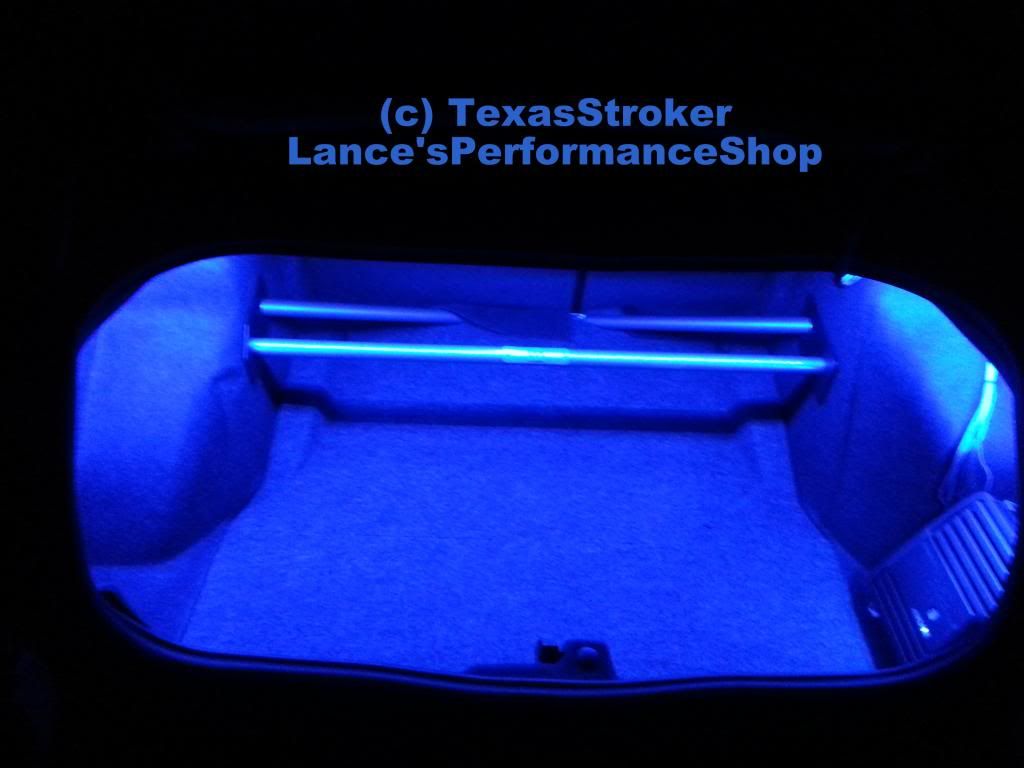


Step 4: Enjoy It!  Or Post It Up!

Dual Mode: Subtle Accent Lighting to Full on "Trunk of Blues"

So now, what is that "Dual Mode" I mentioned?  Well, it basically means that with the flip of one very well hidden switch I can go from full on House of Blues in the trunk, back to my traditional, and more subtle Blue LED Trunk Light Bulb and Amp Accent Light.

However, now that I have seen the House of Blues in my trunk, I really like it...Basically what that means to you is I wasted 40 minutes of electrical work in a horribly uncomfortable position to wire in a switch I don't really need....That's how life goes.

But, being optimistic and not wanting to fully admit I made a bad decision on the switch, I will likely rotate...In the summer when I run errands I won't have to have the full glow.  In the winter months when 7 PM is pitch black, it will come in might handy...and no doubt spark a few more conversations.

Not only does this look AWESOME, it is super functional...you could drop 12 Smurfs in the trunk now and spot them all in no time.  The other perk may not seem as obvious...

Increased Functionality and Practicality 

Think of when you have the spare tire cover up (if you've never done it...go out to your garage, pop the trunk, turn the lights out, and then lift it up)...see how it blocks almost all of the flipping factory illumination?  Not that you'd need it shining on a locked spare or that space saver kit to see things well on the side of the road at night after a flat tire.  The good news, if you have any bodies in the trunk and they are on the cab side of the fold in the spare tire cover, that light won't be blocked...they'll be able to see, but you better have a flashlight to get the junk out of the spare tire well...

That alone is peace of mind...I tested it (need to get a pic) and the difference is huge.  I can actually see the battery and spare tire (M10's have the actual spare tire, not the kit).

If you are not a fan of the really bright light, just remember, I can go subtle with the flip of a switch!

Conclusion (Cough, The Next Mod, Cough)

Now, talking about future mods, Phase 4 of Cloud 10 has afforded me a new direction...

Where I mounted that light to shine on the amp was okay, but I didn't like that if you were on the LH Side of the trunk, and bent just right you could see the light itself...(for anyone over 6' you'd never see it...).  When I'm in full on blue mode in the trunk, I really don't need the accent light in place THERE.

Keyword being "there."  I already tested this with my test strip and I think I might be moving the current light from an "above" position, to an "under" position.  With a little fab work for a bracket, I can mount the light under and behind the amp...This will give a nice glow not only from under the amp, but in the area behind it as well.

Overall, I am very happy with Phase 4 of Cloud 10.  Not only does it look good (and really better than I expected), I gained a lot of practicality in the trunk should I ever have to change tires at night...Plus, simply dropping the key fob into the dark trunk is no longer something to fear (I'm sure many of you can relate to that one).  While I was initially worried this might be "too much light," I am now of the mindset it is just right and further accents the blue on black theme of the M10.

When I get around to relocating the amp's accent light I'll make a new post.

Here is one more look at the Phase 4 "Trunk of Blues:"


Monday, October 1, 2012

Razor's Edge Dual Gauge Pillar Pod

Well, Phase II of my Fall 2012 upgrades is complete...and looks fantastic!  It is kind of a joint operation, but to keep things tidy I'm breaking it down into two segments. You can't really have one without out the other, but this had to be installed prior to the "functional" end of the equation.  Let me elaborate...

For those of you that have followed along, you likely recall how I have mourned not having EVIC from the factory.  Discounting the performance meter, getting readings on degrees F instead of the alphabetical C and H for temps, and a number of other parameters I would love to monitor has been a hard pill to swallow.  My biggest, and most valid, complaint has remained steady: oil pressure.

I know there is a "warning" light in the dash.  That doesn't cut it for me.  Coming from a background with old Mopars, oil pressure is the MOST CRITICAL vital to monitor and it genuinely bothers me not knowing what it is (even though I can assume it is "safe" with the warning light not on).  I am the type that wants to see 50+ PSI on a cold start, 20s at idle, and see how it fluctuates in heat and under heavy acceleration.

Without oil pressure, nothing else really matters.  I'll cover that more in the next segment for this upgrade, but let's get down to business.  Without EVIC you need an extra gauge to monitor oil pressure.

This is where things get complicated.  Where do you mount the gauge?  Certainly the chrome cup on the cowl is not what I have in mind for the Mopar 10....although if this was a 70 Challenger I might go that route.

A recent introduction is the "air vent pod."  This basically plugs in place of your LH Dash Vent and has the louvers around a 2 1/6" Gauge Pod.  Uh, no thanks.  This isn't horrible (and we know the gauge would stay cool in the summer, lol), but this is just too mustang for me.  Just how I still associate the "flowmaster sound" with fox-bodies and chevy trucks, I can't imagine liking this set-up.

A better option is the overhead console pod.  You can source single or dual gauge pods to plug in place of the "Sunglass Holder" in your overhead console.  I like this better than the vent pod, but it isn't my style.  This route is not playing into my driving style, nor my curiosity and desire to monitor engine parameters past what the factory gave us (fuel, mph, rpm, and C-H).  The big perk for those that do like this route is you are not loosing out on much.  Unless you wear prescription lenses while driving, the "sunglass holder" probably will never house anything.  Straws, chap stick, a pen...I don't know what you might do with it, but for me it is just  a flip down compartment my sunglasses don't fit in...If you use the glass holder, you probably don't want to pull it and replace it with a gauge pod.  If you don't need it and like that location you can have a single or dual gauge pod take its place.  If you want to go that route, check out this article where Brian from the Mopar 10 Registry installed one in his Challenger: )

The next option is a dash pod.  I'll be honest here and say this isn't a horrible option, but how you mount it is.  Not many of us are gun-ho on cutting a hole in the dash to run wires and cinch down a gauge pod.  This also reminds me of mustangs, but more so the 94-04 era.  I've seen several people go this route and report back they were upset that it didn't "seal" to the dash.  Take something objectionable to begin with and sprinkle in some poor fitment and you've got a pass on my end.

The last remaining option is to go with an A-pillar setup.  That is just what I chose for the Mopar 10.

The A-Pillar is the best looking option in my opinion, is the most versatile, and perhaps most importantly it fits my driving style the best.  I spend most of my time looking out the windshield so having gauges displayed on the A-Pillar just makes sense.

When I say it is the most versatile I mean it.  The Dash Vent is limited to a single gauge (I guess if you want to get weird and run info thru a passenger you could mount 4 of them), the overhead console is limited to 2 maximum, and I believe the dash pod is limited to 2 as well.

If you really have a lot to monitor you can add 3 gauges by way of the Triple Gauge Pillar Pod.

Mopar had orginally planned to launch this as part of their performance catalog of parts for the Challenger.  I've been told they scrapped it when the air bag became an issue.  Fortunately for all of us looking to add gauges, Razors Edge stepped up to the plate and delivered!

{Enter the content you have been waiting for!}

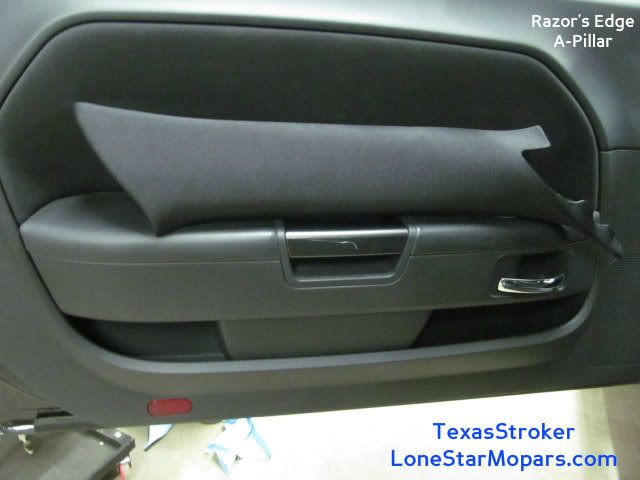
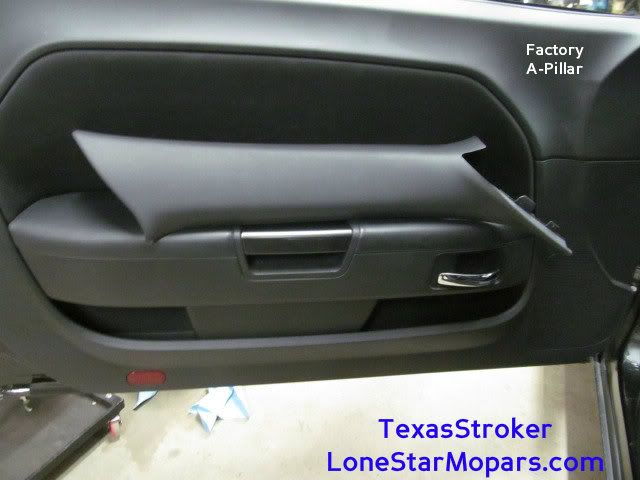
Razor's Edge saw the need for this product and worked around the "air bag" issue by using factory A-pillars.  These factory pieces are ordered in, drilled for wiring, modified with glass gauge pods, and then wrapped in black grill clothe that closely resembles both the headliner and in my opinion door pockets.

Being a factory piece, these are of great quality.  Razor's Edge grafts the gauge pods on at a very friendly orientation to the driver.  From certain angles you would be hard pressed to know the gauges were even on the A-Pillar...it makes for a very clean installation.

I know what some of you are thinking...black?  They used black grill cloth?  Isn't the factory piece gray?  Fear not for you are correct.  I actually like the factory color, that said your concern is likely not because you fear the contrast between the A-Pillar and dash ,but rather have concern over the OTHER A-pillar.

I will say this...I honestly think that short of having someone critique your car, or driving around with someone that likes to talk about funerals, famine, and disease on your way to a football game and concert, no one would notice.  If you are particular, it might bother you.  If you're in the shade, or a parking garage...good luck telling the difference in the stock piece and the modified pillar.  Now that said, if you are out in full sun it would be a bit more noticeable, but this isn't a huge contrast.

That said, if you are like me, just knowing it was different might cost you some sleep at night, so once again Razor's Edge came through with a great piece.  To remedy this scenario they ordered in a factory RH A-Pillar and simply glue black grill cloth over it.  Chrysler must love this shop...

The result is a perfectly matched pair!  You can now add gauges and keep the interior show worthy while silencing critics.

These are high quality pieces that are reasonably prices and coupled with gauges, give you a whole new experience in the cockpit.

Let's take a look at the product and install:

VIDEO COMING SOON!!

Factory A-Pillar Removal (Same for both sides)

1. Disconnect the Negative Terminal from Your Battery

I don't think you'd have an airbag issue, but it is better to err on the side of caution as it is easy to slip and trip something.

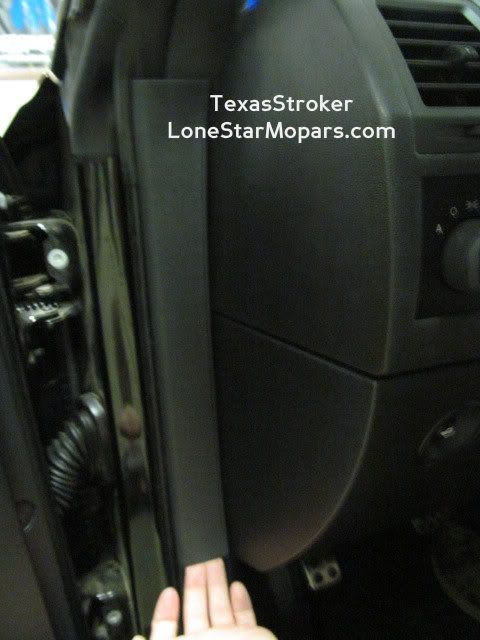
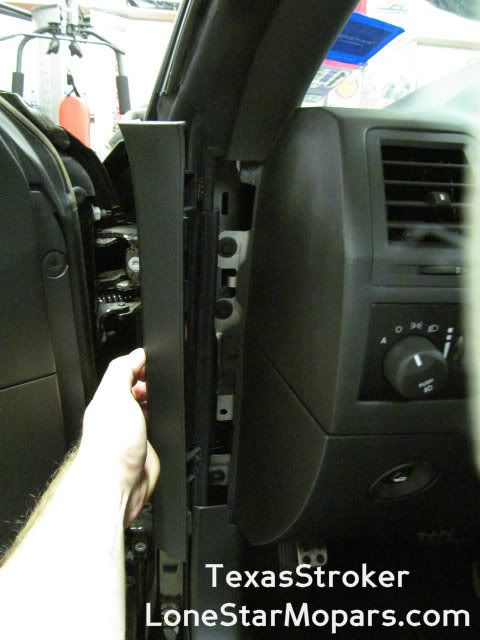
2. Lift up on the trim piece between the Kick Panel and A-Pillar

I like to start at the bottom.  There are two clips, the top is in a bit more securely.


You can see the clips/slots here:


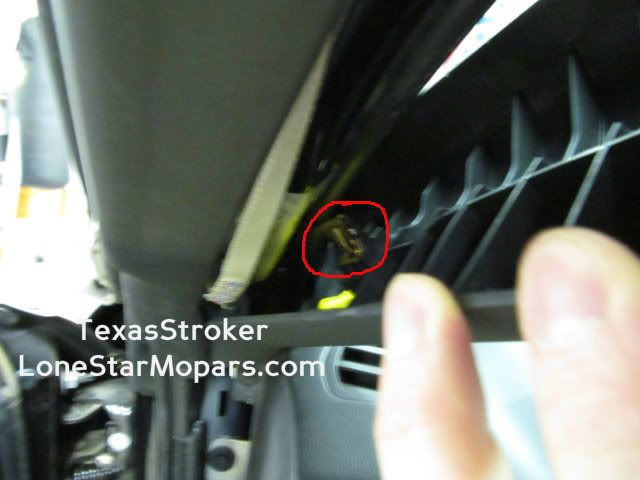
3. Now Grab the A-Pillar near the top at the headliner and shimmy it loose.  You will likely have the plastic pin (seen below) pop and the metal clip remain in the car.  If you can reach it, push in the plastic detent and slide it to the middle, then depress it again and free it from the metal clip.

If you can not reach the plastic detent, simply pull outward to release the bottom clip and then release the top clip as described above:


4.  Simply lift the locators (plastic tabs at the bottom of the A-Pillar) away from their recesses in the dash and the A-Pillar is out.  You aren't looking at but about 5 minutes to do this process on both sides.

Now let's prepare to install the Razor's Edge A-Pillars.

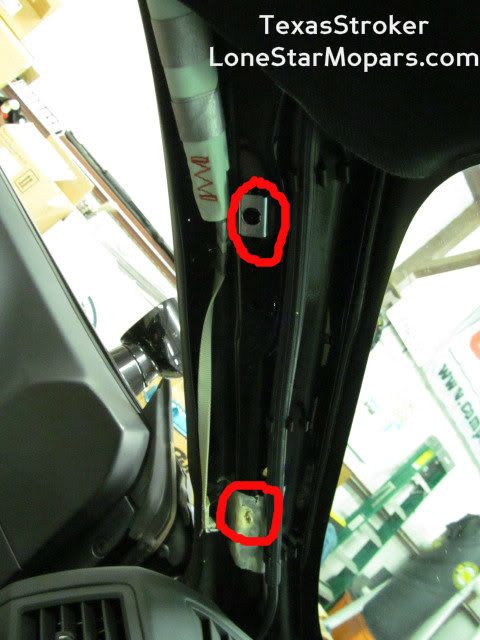
*This is a big tip from my install.  Instead of trying to get the metal clip out of the body of the car, leave it in place!  We can simply remove the same clip from the Razor's Edge A-Pillars and then use the factory clip to secure the new A-Pillars.

The metal clip I am referring to is the top circle in the picture below.  The bottom circle is where the other clip is snapped in place:


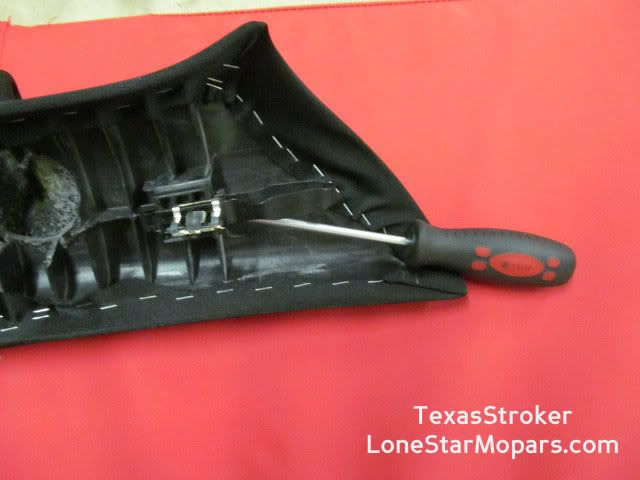
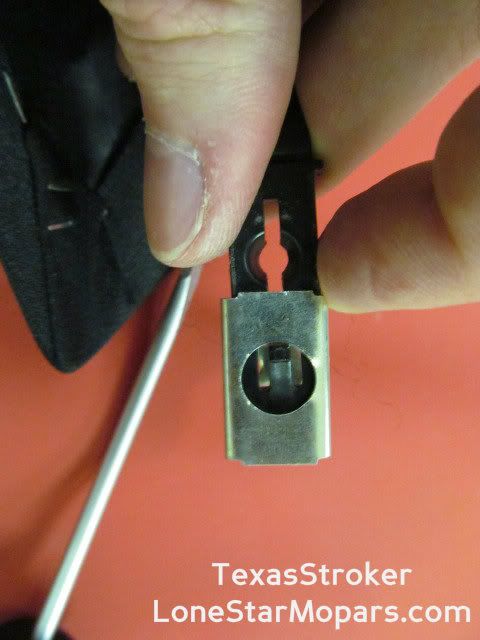
1. Place the A-Pillar on a soft surface and source a flat blade screwdriver or pry tool.  The clip doesn't require enough pressure to have the screwdriver mar the plastic:


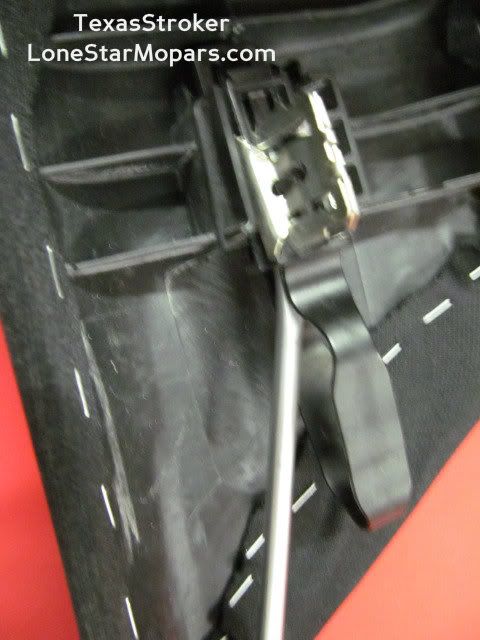
2. In fact, it requires no leverage!  Simply slide the flat end forward and the plastic pin will be released from the clip:


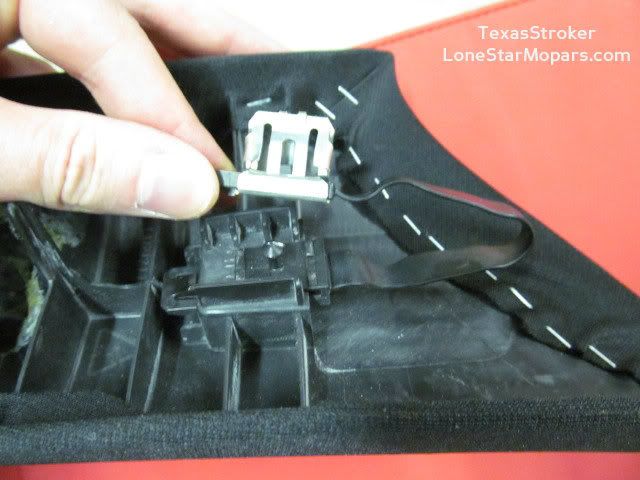
3.  Now we just need to remove the metal clip from the plastic tab.  We are going to reuse the metal clips that we left in the car.  Trust me, this is the best way to do things.  It will save you a lot of time.


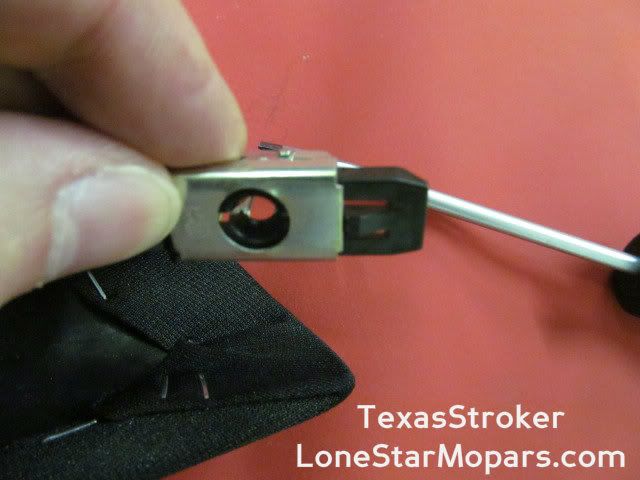
That piece of plastic that raises up is what I call the "detent."  It looks similar to what you see on electrical connectors that clip together.  Simply press down on it and push it towards the center of the metal clip:


See how the tab moved?  Depress the plastic detent again and you will free the plastic portion from the metal clip.  That is all there is to it.

Keep the metal clip and reinstall it on the factory A-Pillars when you have them removed...This will ensure you do not loose it...and if you do, you have a bigger problem anyway.

Now, you are ready to install the Razor's Edge A-Pillar Gauge Pod and/or Matching Passenger Cover.

1.  Slide the plastic tab with the detent into the metal clip you left in the car.  Make sure to insert it all the way (ie the first click will be when you hit the center of the clip and the second will be fully installed).  After that, line up the bottom tabs of the A-Pillar with their respective recesses in the dash.

2.  Use the locating pin on the A-Pillar (large plastic dowel) and find the hole for it near the metal clip.

3.  Get it in place and proceed to press the ball end of the of the plastic hanger into the plastic tab + metal clip combo.  No good way to explain that in writing...

4.  You should now have the A-Pillar snug up top...Slide down the side and make sure to get the rubber trim on the window side on top of the A-Pillar.  This will help you snap the lower pin in place much easier.

5.  Now apply firm pressure along the area where the bottom clip is...When you hear it pop, you are pretty well done.

6.  Apply pressure all the way along the A-Pillar and make sure it is snug, just like the factory piece.  Double check to make sure the bottom end is recessed in the dash and that you have the top end over the headliner. Lastly, make sure the rubber is overlapping the A-Pillar and your install is complete.

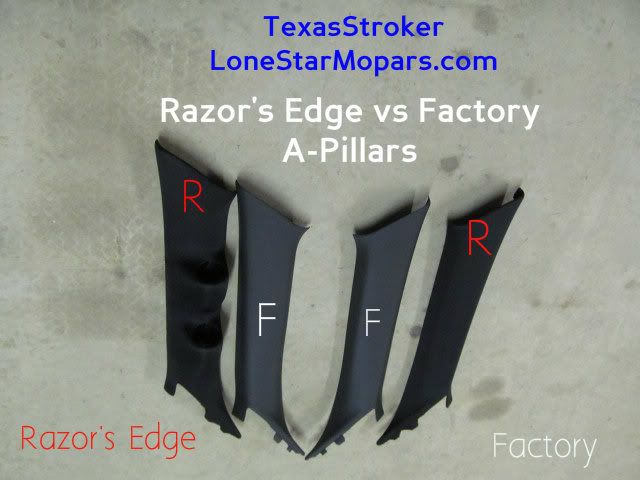
If you have read all that and don't actually have the A-Pillars from Razor's Edge, I assume that is because you are still debating this upgrade, or can't believe someone did all this without providing a nice color comparison.  Fear not...I am with you 100%.  For those of you concerned with the color change, here you go:


Left to Right: Razor's Edge LH Dual Gauge Pillar Pod, Factory LH, Factory RH, Razor's Edge RH

Kind of sloppy, but you get the idea.  The red "R" indicates a Razor's Edge piece while the white "F" indicates the Factory A-Pillar.

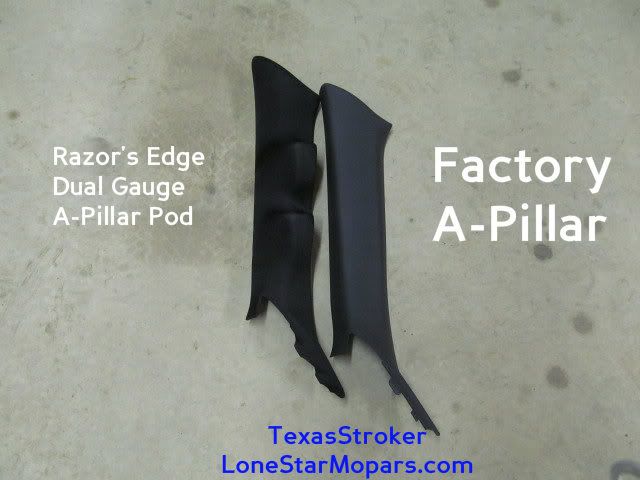
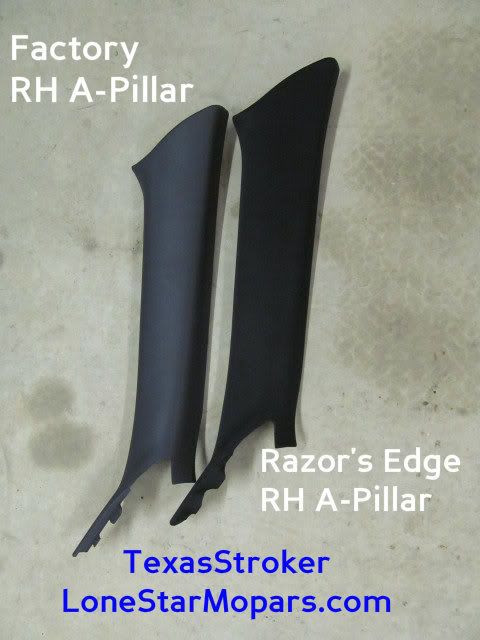
More detail you say?  No problem:


This is just as the captions indicate...Modified Razor's Edge Dual Gauge Pillar Pod beside the Factory LH A-Pillar.


Again, pretty straight forward.  To the left we have the factory RH A-Pillar and on the right we have the "matched" Razor's Edge RH A-Pillar.

What?  You care so much about your late model Mopar you want to see how they look with the car?  As you wish:


I felt like the door actually gave the best showcase for hte color change.  To me the factory A-Pillar is more like the plastic you see on the door panel (top piece with lock know and lower half with speaker grille).  The door's inset area is kind of a darker color than the slate gray in my opinion and I think the Razor's Edge pieces matches it better.


You should see more contrast between the factory A-Pillar and the door's inset than you did with the Razor's Edge Piece.  Alternatively, the factory A-Pillar is dead on with the plastic on the door.

Going with the side-by-side comparison photos from earlier, it is easy to see that the Razor's Edge A-Pillars and the black grill clothe are in deed darker.  But here is the catch...

Factory A-Pillar=Matches Plastic Door Panel and Dash

Razor's Edge A-Pillar=Matches Door Inset and Headliner

Take your pick as neither is 100% uniform.

I've said it before and I'll say it again.  With the Challenger's interior being so dark, you honestly can not tell the difference in the stock A-Pillar and the Razor's Edge A-Pillars in overcast conditions, a shop, a parking garage, under a shade tree etc.

In full sun with the sunroof open, yeah...you probably can.

I truly believe you could run the modified LH Pillar for gauges and keep the stock RH Pillar and never get caught...unless you are dealing with someone who is nitpicking your entire car.  That said, I sprung for the matching passenger side and couldn't be happier.

The installation of the Razor's Edge Dual Gauge Pillar Pod and Matching Passenger A-Pillar was truly painless and took only a few minutes.  The placement of the gauges and viewing angle is perfect for me and when combined with gauges, it makes for a total interior transformation.

The Gauge Pods are integrated so smoothly, only the most keen eyes will notice this upgrade.  Those looking enough to notice it are probably wanting to do the same.

If you have an eye for mods, you can see the gauges from both windows and trained eyes can catch the telling bulge from a front vantage.

At night the glow from the gauges serves as a warning sign to would be contenders that they are dealing with a modified Mopar and should think twice before getting embarrassed.

All-in-all, if you have the need for gauges, this is the way to go in my opinion.  It is a slick install and blends custom and function flawlessly.

You can pick up your Razor's Edge A-Pillar Gauge Pods and the Matching Passenger Side Cover here:
http://www.razorsedgemotorsports.com/category_s/220.htm

Monday, July 30, 2012

Mopar Nation Midwest Meet 2012

I haven't gotten to make many shows this year, but one I did get to make was the 2012 Midwest Meet.

One of the reasons the M10 appealed to me was being able to just hop in the car and drive...Shows that seemed like a rough trip in an old car (ie 4.10 gears, are there enough gas stations etc) turn into just a leisurely and enjoyable road trip.

Things lined up and a few of us from AAM headed over to OKC over the weekend of July 27th-29th, 2012.

The line-up was pretty simple:

Friday 7-27-2012: Dave & Busters, Thunder Valley Raceway
Saturday 7-28-2012: Andy Alligators, Night Show at Riverwind Casino

I headed out Friday morning eagerly looking forward to cutting some good times at Noble.  Thanks to the 75 mph speed limit I was able to cover ground pretty quick, and if not for some construction on the Oklahoma side of the state line it would have been record time.

This is what most of the drive looks like:

This does tend to get your attention.  It is in Groom, Texas and is the largest cross in the Western HEMIsphere (see what I did there?):


Farther to the east, things were strange...green in fact.  It was easy to tell where the rain had fallen and where it hadn't.  I didn't take this picture because of the terrain, but simply because of the color:


I was able to get in ahead of the official schedule, but to my surprise as I pulled in to Dave & Busters (roughly 1 hr ahead of schedule), folks had just gotten in, parked, and were headed in the door.  I'd never been to Dave & Busters and figured the food would suck...it was honestly pretty good and being that this went down Friday at lunch time, the crowd was a non-issue.  Several of the games were fun as well...still don't quite understand their points/scoring, but oh well.  Main thing is it was fun!

Here is a shot of what I found in the parking lot:


And a little more of Dave & Busters:


Next stop was the hotel where a few of us were bedding down for the night:


A little after check-in, it was time to hit the track:

Special thanks to the photographer who got these shots:

Ruby vs Destiny on the Track!

M10 Ready to Launch (check out the wicked glare...you try finding a green bulb looking into that!):


If you recall, I had mentioned my hopes of "getting some better times."  Ordinarily, Thunder Valley in Noble is a great place to go fast compared to the home track.  It mainly comes down to DA and prep.  The prep was fine, but the weather was not.  This entire weekend was like a sauna...but no one wanted to be in it.  The track opened and the air temp was hovering around 110 and couple that with a pretty high humidity and it made things miserable not only for racers, but the cars as well.  Nonetheless it was a good time and I'd love to go back in the fall some time to get some better times in the M10.

I think I only made 3-4 passes.  The first one was quite interesting due to the fact I was looking right into the sun.  I cut a red light against a Mopar 11 equipped with nitrous, but was ahead of him the whole way down the track.  It worked out quite well to redlight there as it kind of made up for their deeper rear end gearing.  It probably looked pretty cool from the stands if nothing else, lol.


And just in case anyone reads this and is inspired to hit the track...the road out is pretty littered...with law enforcement.  I don't think I've seen that many police cars waiting in the weeds in years.  Luckily not knowing your surroundings and being in the dark you tend to go slow.  I know a lot of people leave the track and get on it...I held off, and I'm glad I did!  I don't think the folks in Noble will have any trouble with returning racers speeding through town again.

I got back to the hotel...drove to a car wash and did my best to make it presentable:


Came back to the hotel and talked to a friend that redlit in the finals.  Woke up to find the sauna was already heating up at 7 AM and hit the town for some more fun.  Look what I found:


Before you knew it, it was time for the show...It was a solid turnout and there were actually a lot more late model Challengers than anyone expected.  This show is usually LX heavy, and I truly think the Challenger showing caught everyone off guard...Can't complain about that though!


As you might have guessed, I was the only M10 in attendance.  Some day the Trinity will align!

Anyway, I was in the Stock Challenger class (fewer than 3 mods), and found once again that there are still a lot of people that have no idea what a Mopar 10 is...and yes, this was an all Mopar show.  I really need to get a poster made to explain what the car is.

Regardless, one of the "mods" (although I consider it more of a custom styling accent than a mod) is of course the lighting.  First I swapped the interior lights....then the fog lights...and wrapping up right before I left the house for OKC was Phase 1 of  Cloud 10: Footwell Lights and Underbody Lighthing (Phase 2 Coming Soon!).  I was really inspired to get this taken care of because this show is a night show, and thus the perfect setting to display the custom work.


This might be my favorite shot...Really shows that the underbody light makes people step back and think about things...or get down on the ground and try to figure it out:


Well, as fate would have it the weather was so disagreeable the show wrapped up a little early.  Hard to get votes for something when no one knows you have it.  Luckily, a few folks on the judging staff saw it and must have appreciated it because the M10 was selected as the winner of "Best Lighting!"


In addition to the trophy, I got $100 to Fasty's Garage...although I still haven't received it or any info on it, but I at least have the trophy!  I consider it to be more a testament to a car than the driver in most cases, but I will gladly take a little credit for the lighting.  I know a lot of people don't like it, but hey...it is my car and I think it looks like it belongs there.  Plus, when was the last time you saw a Challenger that was blacked out with a blue glow at night?  The pics really don't do it justice, and I think it really suits the car.


After that the fun was over and the next day we all headed back.  I did stop for a few more photo-ops:

First up is a rest stop overlooking a canyon.


And of course, here is the largest cross in the Western HEMIsphere once again...


I did make one other stop, which I decided to chronicle in a separate post.

All-in-all it was a good time.  The M10 got some valuable highway miles, which is rare given the multi-hour run times.

Dave & Busters was great, the track was nice, had a lot of fun the rest of the trip, and the show was pretty good too.  The fact that the just completed Cloud 10 garnered "Best Lighting" just made things that much better!