Showing posts with label Mopar 10. Show all posts

Wednesday, January 15, 2020

Mopar 10 Custom Artwork Banner by Automolove.ca

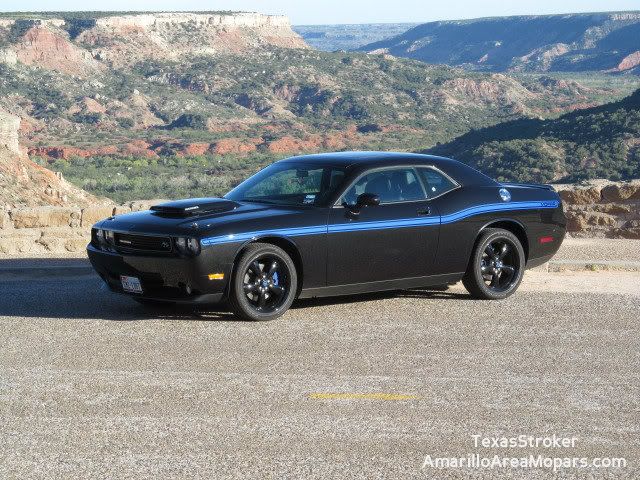
Today, January 15th, 2020 marks the 9 Year Anniversary of when I picked up the Mopar 10!
To celebrate, I started a little earlier this year...like fall of last year early.
I contacted Robin McQueen of Automolove.ca to draft a custom banner of the M10.
I have a lot of subtle, custom changes and Robin was more than willing to work them all in...
The end result is the coolest piece of wall art I own!


If you are interested in picking up a banner for yourself, head over to Robin's website and let him know Lance sent you...
He is an old school Mopar guy and specializes in muscle-era Mopar artwork!

https://automolove.ca/

Thursday, March 24, 2016

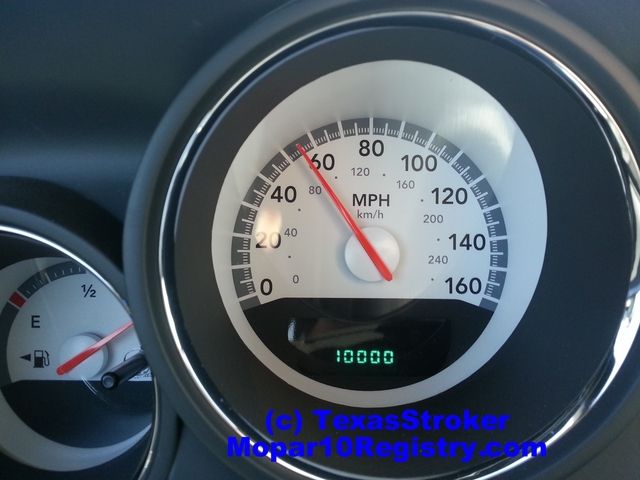
12,500 Miles

Tonight, the Mopar 10 hit 12,500 Miles!  Not a huge milestone on its' own, but it is half-way to 25,000 which is a big one!

The occasion you ask?  Just running routine errands...yep, it remains a daily driver outside of hail and ice situations.

Another attribute was the M10 earning a 10 minute conversation from the kid who brought the groceries out.  Not bad for a Challenger that had just been out in 3 days of heavy, heavy Texas dust.

Friday, January 15, 2016

5 Years of the Mopar 10

Another year, another milestone!

It is VERY hard to believe that 5 Years ago today, I flew down and picked up the Mopar 10...I would have rolled into town just a few hours ago.

The Mopar 10 has remained an absolute join to pilot and there have been no significant issues, although the factory tires are finally getting close to their last tread.  The car hasn't been driven as much these past few months as I have had a few projects in-line for it that have been held up by other obligations.  It got parked and treated to the black lug nuts in early September mainly due to TWO tires having nails in them.


I have never been a fan of Goodyear tires...this is solely based on my experience with the factory Wranglers on my 01 Ram.  They had the worst tread wear I have ever seen.  Looking at the mileage, 12k is about where they really started to run empty and that is about where these F1s are.

However, despite the abysmal mileage on these factory treads, I have found that they actually do hook quite well...the downside to that is they pick up rocks very easily due to the softer compound...it isn't as bad as the Mickey Thompson Indy Profile S/S tires on the Duster, but it is not far behind.

Needless to say, I am pretty sure that some point in this year I'll have to spring for some new tires.  Last I checked, F1s were very expensive, so I will likely look elsewhere, but aside from the wear rate I can't complain about these F1s.  For anyone wondering, my likely choice will be a set of Nittos.  I've had very good luck with them in the past...

Also of note, I drove the M10 home from work tonight with NO HEADLIGHTS.  I mean technically they were in there, but neither side was connected.  It wasn't dark, but it was probably within the "sunset window."  Work got out a little later than planned, but the park lights got me home (I like the sinister look just the park lights lends pretty much any vehicle).  Nonetheless, I got back with enough daylight to snap a few pics before pulling the Chally in...

Interesting enough, at this time last year I was talking about a "Bright Idea" essentially an idea to upgrade the factory headlights, which are very lackluster.  If you haven't put 2 and 2 together yet, that is exactly why the factory bulbs are out...well the passenger side anyway...and the driver's side is there, just disconnected.  As soon as time allows (possibly tomorrow?), I will get out and finish up that upgrade.  It will be a big difference and I will finally be able to see down the road.  If you have anything past a base model Challenger, you likely have better headlights than the M10.  They are just the standard halogen bulbs like the 01 Ram has.  For some reason, likely the front fascia, the light output is abysmal.  I drive a lot of back roads (see also, no street lights) and the factory headlights perform slightly better than the sealed beams the Charger use to have...or in other words, I could tape Maglites (the flashlight...no one talks about those anymore) to the fenders and have an upgrade.

Given that this is now 2016 and lighting technology has progressed big time, I find that unacceptable and took action, as promised, last year.  As with most things, plans didn't exactly go as planned with the parts...I have come across quite the situation, one which I've not seen documented anywhere.  The case in point is that components manufactured to a certain spec. are in fact not compatible.  Imagine if you needed (2) 1/2-13 x 2 1/2" Bolts for a project.  You have (1) in your stock pile and it fits great...you go to the store and buy one and it doesn't fit.  You then go to another hardware store and they sell the same one that is threaded differently.  You hit up a 3rd store and ask for a 1/2" x 2 1/2" with coarse thread...take it home and no bueno.  The bolt fits each stores nuts, but you are left wondering why your old bolt, that specs out on the thread gauge as the classic 1/2-13 threads in perfect and the "new" bolts don't.  It wasn't a bolt that gave me this trouble, but rather a connector and I've yet to get an answer from anyone.  In my opinion this is classic outsourcing coupled with a lack of quality control.  People will run into this issue over time and I'm sure across other models, but my big hope is that it is corrected at the source!

Anyway, I have found a fix and naturally, it requires the end user to modify beyond reasonable measures, the aftermarket parts...I will do just that and we will make it work.

That is all for now...I still can't believe it has already been 5 Years, but I look forward to even more time with the Mopar 10.

If you are a Mopar 10 Owner, are you on the Registry?  If you are an Original Owner, you should be, or already have hit your 5 Year Anniversary!  What did you do?  Any upgrades?  How long did your factory F1s last?  Check these links out and I hope you are enjoying your Mopar 10 as much as myself.

Mopar 10 Registry: http://www.mopar10registry.com/
Mopar 10 Forum: http://www.lonestarmopars.com/mopar10/forum/
Mopar 10 Twitter: http://twitter.com/Mopar10Registry
Mopar 10 Facebook: Click Here
Mopar 10 Forum's 5 Year Thread: 5 Year Anniversary


Wednesday, September 2, 2015

Gorilla Black Chrome Lug Nuts

Tonight, I rotated the Mopar 10's tires and swapped out the factory lug nuts for black lugs from Gorilla.  This was exasperated by having a screw in the Driver's Side Rear tire dropping about 5 lbs. a day and a nail in the Passenger Side Rear Tire that surprisingly held air after the initial impact.

Check back for pictures and videos!

Friday, August 7, 2015

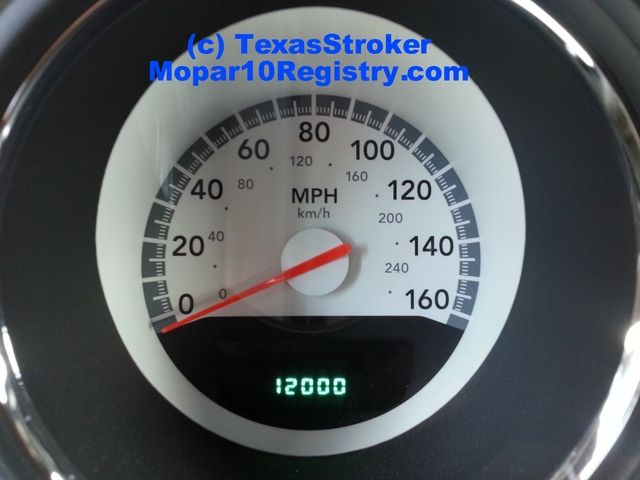
12,000 Miles

As of this morning, the M10 officially rolled up on 12,000 Miles!


It was nice timing as I just started using the UVS Covercraft 100 Sunshade yesterday, have some parts I plan to order, and maybe most importantly hope to get the oil changed this weekend.  Things have been quite busy as of late, so while it seems simple, it will be a big accomplishment.

If the M10 stays in the shop, I'll likely proceed with the next upgrade in the coming weekends!

Thursday, August 6, 2015

CoverCraft UVS100 Custom Sunscreen

What: CoverCraft UVS100 Custom Sunscreen
CoverCraft Part Number: UV11079BL
Fits: 2008-2014 Dodge Challenger
Sourced from: SummitRacing.com
Summit Racing Part Number: CVC-G64000B
Price: $54.64 plus Shipping

Unboxing and Overview of CoverCraft
UVS100 for 2008-2014 Dodge Challenger


Well, this was not an anticipated purchase.  Given that I drive the M10 daily for the vast majority of the year, I put a priority on landing a good sunshade back when I got the car.  I had sourced a really nice looking sunshade that was a "True Blue" color and looked great with the M10's Blue Side Stripe, you can check it out here: Sunshade Blues

Sadly, a few years of the Texas sun baked this sunshade...I'm still puzzled by that given that I've run a similar sunshade in the truck for probably 10 years now and it has never "melted" like this one did...the blue has not faded much at all.  One of those mysteries I suppose, or perhaps a lesson I should use more reflective colors...

Anyway, most sunshades are of the same quality...You can roll into any auto parts store, specialty shops, Walmart, or Target and you basically have the same sampling of sunshades.  Some prefer the pop-out boxy kind, some like the roll out (although I can't say I've ever personally known of anyone that does), and most, or at least based on what I've seen, like the accordion style that offers a bit more substance and a compact design.

Since I still  have the opportunity to protect the Mopar 10 from UV Rays (opportunities you don't have with old cars), and more importantly the fact that my current sunshade is melted after 3 or so years, I didn't want to re-order it.  The other options are of the same similar quality, but with lame color choices...I personally am just not a fan of silver sunshades for the M10.  If I had a silver, or white Challenger yes...but a bold black and blue combo needs something to compliment it!

So, thus enters the UVS100.  They are pricey, but if I factor in another sunshade at $10-20 with $10 or so in freight, I'd basically hit this price point with the second iteration of my initial purchase.  Plus, given the fact so many shades claim to be a deep, dark blue and turn out to be teal, or seafoam green is further incentive to bite the bullet and make the investment in CoverCraft's offering.


I had looked at the UVS100 when I first got the car, but they didn't offer a dark blue and I had never really had issues with the shades I'd run in the past...They held up, stored easily, and made a noticeable difference in interior temps when leaving work....The UVS100 and similar priced offerings just seemed a bit overkill.  I'd rather put the extra $30 into some other upgrades, custom work, or even detailing supplies.

However, after ordering this thing and getting it in, I can see where the extra price comes from...although I still think a $29.99-$39.99 price point would be much better and likely result in more products moving to offset the price drop.  That aside, this is rigid!


You know how you can bend, roll, or contort your typical Auto Zone sunshades?  This UVS100 is made with foam panels.  Not only are they a better insulator, but they make for a solid product.

While the generic sunshades come in small, medium, large, and even Jumbo that seem to be one-size fits all (you know, Small and Jumbo both fit your 01 Dodge Ram), the CoverCraft UVS100 is custom cut from a pattern for an OE type fit.

One really big upgrade, and a nod to the overall quality of the product, is the felt back.  It might seem minor, especially in a car like a late model Challenger but let's put this in an old B-Body with a painted dash..Would you rather have a hot and rough foil dragging across your paint, or a cool-to-the-touch rigid board with a felt backing?  Yep, made my point didn't I?  It does seem overkill, but hey...when you are paying this kind of cash for a sunshade, it is nice to see something substantial to reflect that.

Speaking of reflect, the sunshades are triple laminated and stitched...In fact, each one is made by hand!  Pretty impressive!

I opted to spend the extra $5 to get the Storage Bag.  It is just a simple vinyl-like bag that the sunshade slides into when not in use...There is no "velcro" wrap around on these shades, so the bag is nice choice.  If you are super budget conscience I don't envision one opening up in the backseat, but when you're spending $50-$75 on a sunshade, it makes sense to invest in its protection as well.

As of right now the jury is still out on longevity.  I can't imagine it NOT lasting longer than my previous shade, but we will see...I didn't think it would burn up in 3 years either.  The first day I drove to work with the UVS100 I left to a 104 degree car.  Before you panic, the car was 110 the day before and it was actually cooler that day.  I suppose the Texas sun is a pretty good measuring rod for this type of product so I will keep you posted.

The fit is fantastic though...there is a slight gap along both a -pillars, but you can keep it uniform, or simply slide to one side to close it off completely.  The top has a slight gap as well, but it is held up by the visors.  The only real point I found heat coming in was from around the rearview mirror and that is to be expected with any sunshade.

The shade either slides right into the bag, or requires me to coerce it a little, but again...this is just insurance on the investment if you will.  While stored, it disappears into the black abyss of my back seat, or passenger side floorboard.

The blue metallic I opted for sets it off very subtly.  I would have no doubt preferred a Mopar Blue, but this is alright...It is just enough to catch the eye of any car guy, or gal and let them know the shade is something special.  I hope it holds up and doesn't color fade, but again that is something I will monitor.

There really isn't a lot to say about a sunshade...you run one or you don't, you like this style or the other, and you want a certain color or are indifferent.  I think pictures would do an adequate job showing this product off, but most folks gravitate towards videos so I opted to showcase it there and for one additional reason.  Prior to shelling out $50-$75 for a sunshade I personally want to know it is worth it, or why it is priced that high.  Plus, manufacturer colors are often misleading...I could find nothing outside of promotional videos on these shades so I figured if someone was in the market for one and wanted to research it, this might help you out.

I can honestly say I don't feel ripped off, but I still think the price is a bit high...That said, the initial quality is outstanding and the fit-and-finish is top notch.  If the Mopar 10's seats last a bit longer and I don't get tattooed by the shifter handle, I reckon we've made a good decision.

If you have any questions, or would like follow up information, feel free to post up on the forum:


Friday, April 17, 2015

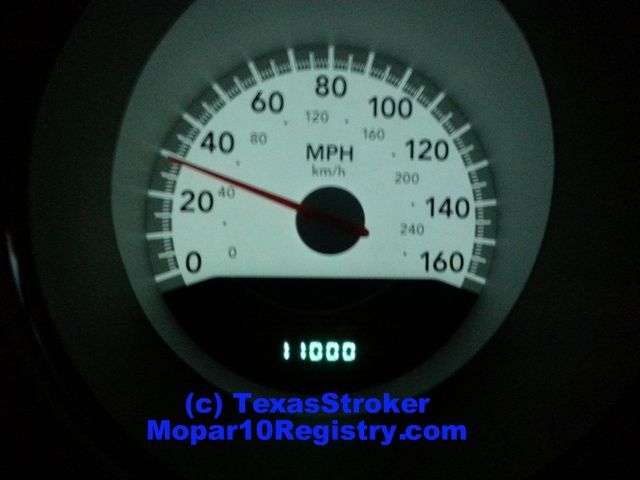
11,000 Miles

Today, Friday, April 17th, 2015 I hit the 11k Mile Mark coming home from work in the Mopar 10!


There was also a very ominous cloud overhead that I tracked via a few pics on the way home...I think a they are pretty cool!

Thursday, January 15, 2015

Four Years of the M10

Today was a big day for the Mopar 10; it was the 4th Anniversary!

Hard to believe that at this time four years ago I was booking a one way flight and then driving home in the M10.  This of course took place Friday night into Saturday, but the date falls on a Thursday this year.

The weather has been quite cold this year, but more importantly we had a few ice storms and some snow...While I drive the M10 a lot and thru all kinds of weather, I'm always leery of ice for the simple fact someone could slide into me.

All of that coupled with shorter days and the cold weather left the M10 parked for awhile with its' stable mates.

I took care of that tonight by opening up the gates and letting the M10 stretch its legs.

I also came clean with an idea I have had a for awhile now...I wonder if the new projector beam headlights you see on 2015 Challengers will retrofit to the "older" models.  The factory headlights aren't all that illuminating when you get right down to it.

You can read more on the "Bright Idea" on the Mopar 10 Registry Forum:
http://www.lonestarmopars.com/mopar10/forum/viewtopic.php?f=15&t=191

I usually like to treat the M10 to something special around the Anniversary date and this would be another upgrade that would not only enhance the aesthetics and night time driving, but also keep those original factory housings pristine!

It is something I am investigating at this moment.  That said, as fate would have it, this weekend and early next week are shaping up to be some very nice January days...Days in which I will be enjoying the services of the M10!

If you commemorate your Mopar 10 Anniversary, be sure to post up on the forum:
http://www.lonestarmopars.com/mopar10/forum/viewtopic.php?f=26&t=190

Monday, January 27, 2014

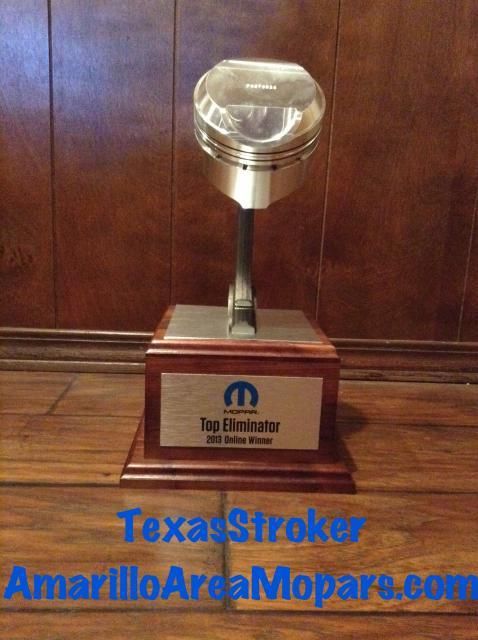
2013 Mopar Online Top Eliminator

Today was a great day for the M10.

I rolled in to work on a very chilly January day (topped out in the mid 20s, single digit windchills all day) and was greeted by a package...a very, large box with lots of packing material.

Turns out it was for good reason as the Mopar Online Top Eliminator trophy was inside!  I have to say, it is much bigger than I expected and looks great!


Despite the car being less than spotless, we snapped a few pics on break.

A big thanks to everyone that helped spread the word and voted for the M10!

More to come shortly!

Wednesday, October 16, 2013

Mopar Top Eliminator 2013: I'm a Finalist and Need Your Vote!

Well, this is a pretty big honor...

My Mopar 10 is one of Ten Finalists for the 2013 Mopar Top Eliminator Program!

The catch is, to win, you have to garner a lot of votes.  The contest is run through the Mopar Facebook Page.  I am not big on Facebook, and the vast majority of my friends don't even have profiles.   A few have said they can vote without being on Facebook, others have to be signed in...

Either way, I would appreciate your support.

My Mopar 10 is "Vehicle #5."

You can vote once every 24 Hours!  Please vote and spread the word to your friends.  Here is the contest link: http://a.pgtb.me/FfxH6P

Thanks in advance for any support!

Image

Image

Sunday, April 21, 2013

Cloud 10, Phase 4: Blue LED Trunk Lighting

Long time no post...I am still back logged on milestones the M10 has hit and of course, the subtle customizations and performance mods I have made, but those will come in due time.

Cloud 10, Phase 4: Blue LED Trunk Lighting

So, first let me say, that due to things mentioned in the previous post, "Cloud 10" has yet to fully be documented or explained here...I plan on going back and creating new posts to cover that.  Here are some basics:

What is Cloud 10?

Cloud 10 is the Project Name I gave to lighting up the M10.  You often hear the old adage about being on "Cloud 9" right?  Well, Cloud 10 takes that and 1-ups it...in true Mopar fashion.

Since my car has the blue stripe...and black and blue is one of my favorite color combos, I chose to accent the M10's factory appeal with some subtle, custom lighting.  Phase 1 was simply swapping over to Blue LED Bulbs.  Phase 2 was the sweet Blue LED Footwell Lights.  Phase 3, which I had beautifully documented, but put off for other things, was underbody lighting.  Phase 4 kind of ran out of time before the big Midwest Meet and believe it or not, here on Saturday, April 20th, 2013 I finally got to finish it!

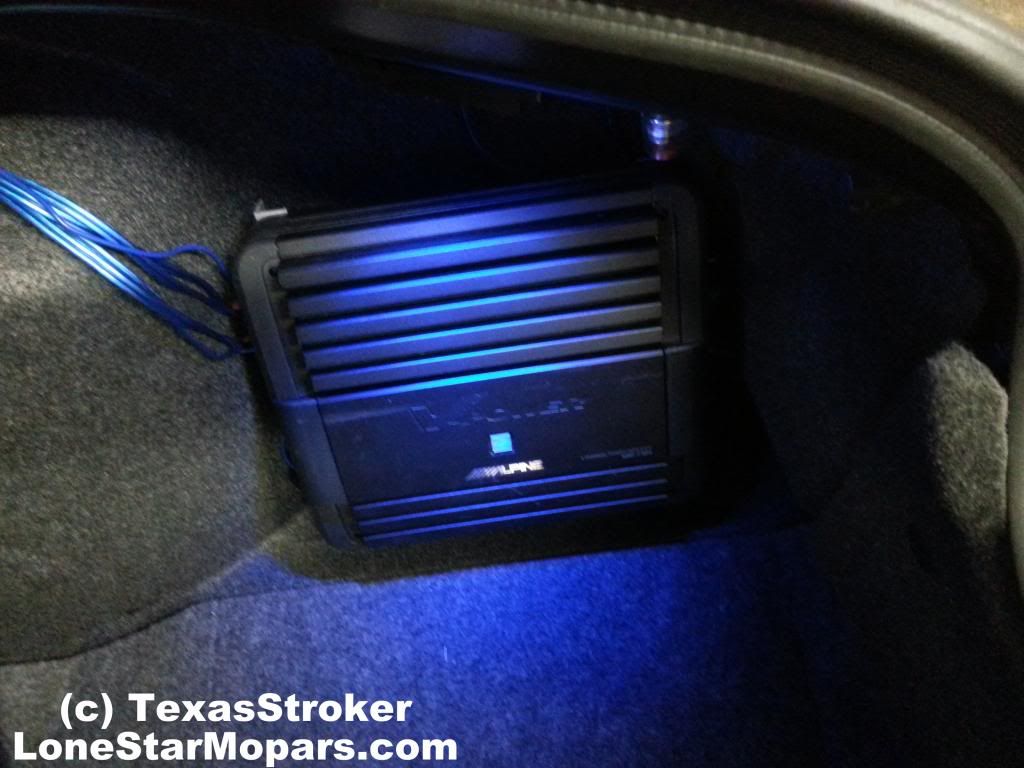
But wait, "You already had blue LED lights in the trunk...didn't you?"  Yes I did.  "And I thought you had an accent light on the Alpine Amplifier?"  Correct once more!  "So, what did you light up?  There is nothing left to light back there."  I would agree, until I experimented.

Way back when I wired in the accent light for the amp (which was great btw)...did it's job casting a nice, blue light on the ol' Alpine:


I went ahead and ran some extra wires and pre-terminated them for future expansion...I'll be honest, even though it took me 9 months to take advantage of it, had I not pre-wired things way back last summer, I wouldn't be making this blog post right now...the back of the Challenger would be torn apart and I'd be needing another few hours to wrap things up....

As is, I literally whipped this out in 20 minutes...granted I then spent about 40 on the switch, but a lot of that has to do with the horrible contortion job you have to do to bend over in the trunk...and my insistence on a "dual mode," which we will cover here shortly.

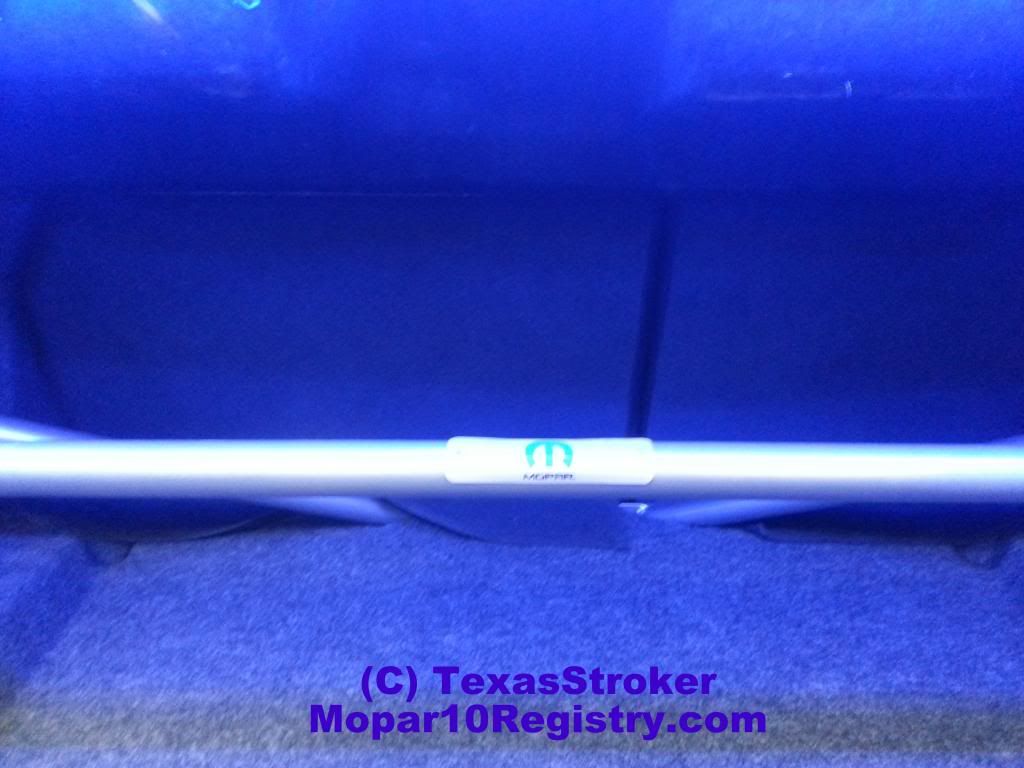
Now, you are still probably wondering what else I could possibly light up...factory center light shines on the Mopar Rear Strut Tower Brace and the Amp is lit up and it seemingly casts a bit more light to help out in the dim trunk...That is correct.

Here is the thing...any custom light, factory light, or ducktaped flashlight really doesn't do a good job illuminating the trunk...These are big cars...the location of the factory light is a limiting factor.  You get poor illumination behind the beam angle, and due to the position it is set, the beam doesn't really even do a good job pointing light forward where you would most want it (forward, center).  Take a glance left or right and you might be surprised those dark caverns are actually the right and left most reaches of your trunk.  Try setting a cell phone down in the trunk, shutting the lid, and popping it to tell a buddy to go find your phone in the trunk...10:1 he will use his phone to call yours after a few minutes of pawing around blindly.

While you can kind of see, it is by no means as good as it could be...and it certainly leaves plenty of room for  improvement...and that is what we like to do!

So, enter Phase 4's concept...trace the rim of the trunk with lights and see how it looks.

Here is the thing though...and some folks may be offended.  I can't stand seeing a light source.  It takes all the trick and custom out of it.  I'm in a room with can lights...I look up and see the can, bulb, and light...then spots for looking at it.  Think if the ceiling in your office was a pane that looked like a solid ceiling, but emitted light when the switch was on...People would think it was pretty cool right?  You bet they would.

I have a picture from the Midwest Meet where a young kid got down on his belly to try and see how the M10 was putting blue light on the pavement.  By hiding the light source, things just look better.  I know plenty of people that will see this post, run to AutoZone, pick up a 12" stick of LED or Neon and tape it to their trunk liner...while you will have cool lighting, you'll see the source...That bothers me.  I see it at shows where guys just plaster LED strips, Neon tubes, and cathodes from the engine bay, to the dash, to the trunk...seeing the light source kills it for me.  Sometimes you can't fully hide it, but you can always do better than making it like an old bulb & socket.

I tested things out, and was impressed with what my little 10" test strip lit up (times like these you realize how lackluster factory appointments can be).  My issue was I was pretty content with my center and accent light set-up...I was afraid based on the test strip that I was about to light up a small town square.  That said, I knew I wanted that look...so I decided to plump a switch in to let me go into "dual mode."

Enacting Phase 4 of Cloud 10

That said, I suppose before we cover that we need to see just what I did...

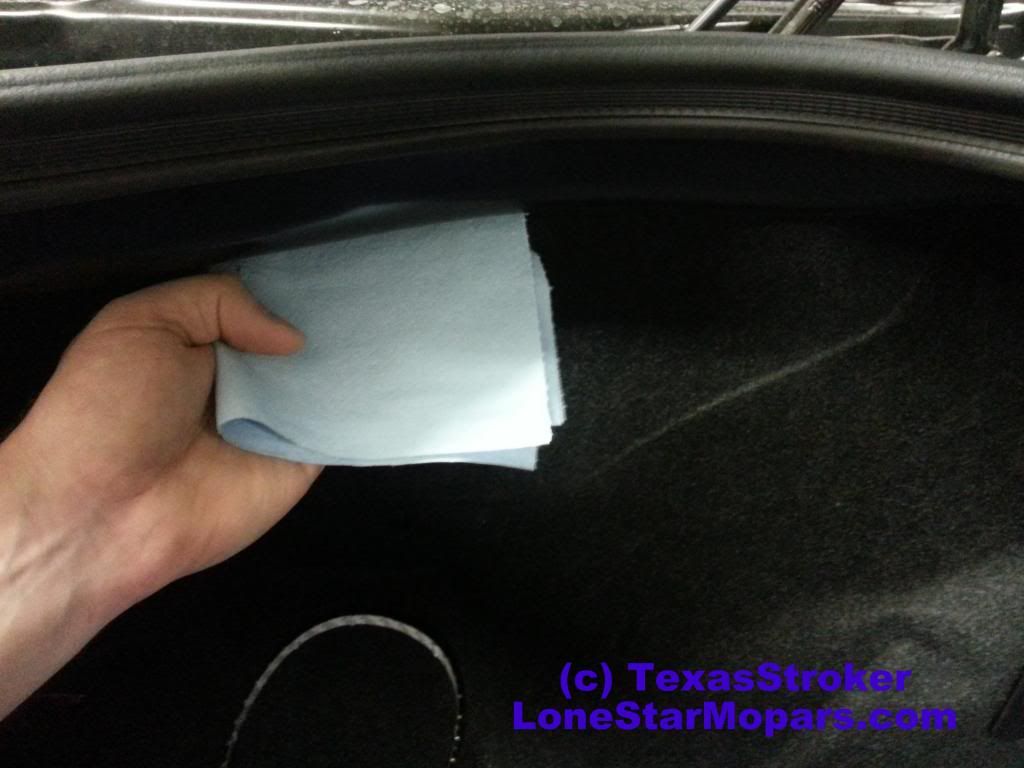
Step 1: Clean & Prep (Assuming You are Pre-Wired)

First thing first, when you are going to be adhering or mounting anything, always clean and prep the surface...I like to get the dust off with a shop towel and then turn it inside out with a little Prep All (wax and grease remover).  If you detail your car and slather on wax, or more likely have traces of Armor All etc on the mounting points, clean it up!  If you are going to do something, do it right:


Step 2: Wiring Diagram, Test Fit, Wire-It-Up!

Next up, you need to trace your wiring out and ensure you have enough slack for where you plan to mate the  leads and lighting...In my case with the switch you need the following:

-Earth Ground
+Supply Volts
*On Accessory

To break that down you basically need to tie the switch in with the factory ground...Then feed the hot lead to the "Supply Volts," and lastly run the power wire from your light source to the "On Accessory."  Most switches have a similar layout...you can usually invert 2 of the positions, just make note of "On" and "Off" if the switch is labeled.

I usually go into great detail on the tech end, but I was in the shop, on limited time, and only had my cell phone handy...Plus, until I go back and see what I mapped out, I would have needed a lot of time to pin down the factory wiring colors given I pre-wired this back last summer.

Since I did the switch, I had to mount it...I picked a really trick location.  I debated showing it, but I think I'll keep it low key for now...Can't spill all the secrets...

Step 3: Test Your Work

That said, here is what we come out with in the test run (note these pics are with the shop lights on):

Center View, Shop Lights On

Center View, Close Up, Shop Lights On

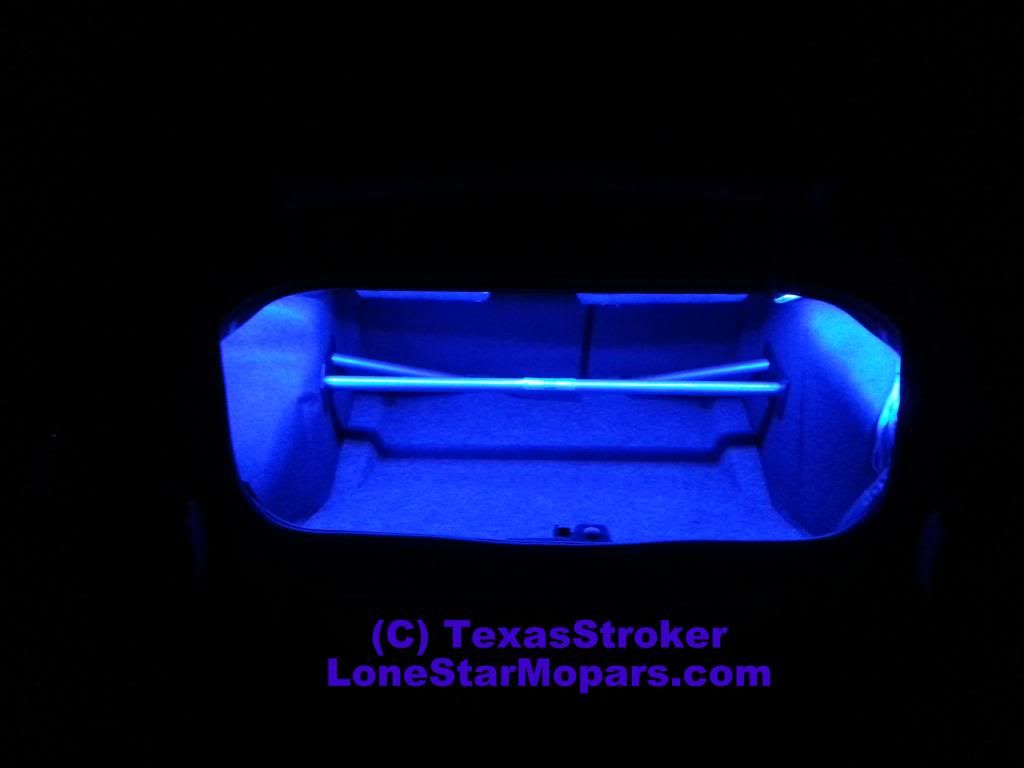
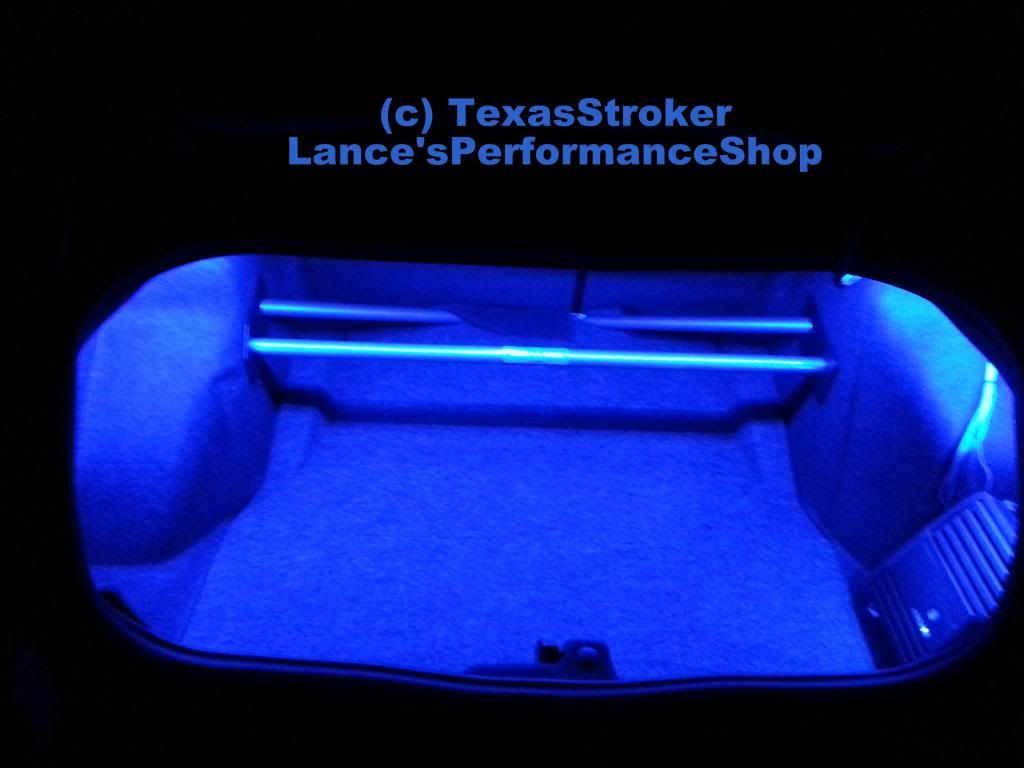
Center View, Shop Lights Out

Center View, Closer-In, Shop Lights Out


Step 4: Enjoy It!  Or Post It Up!

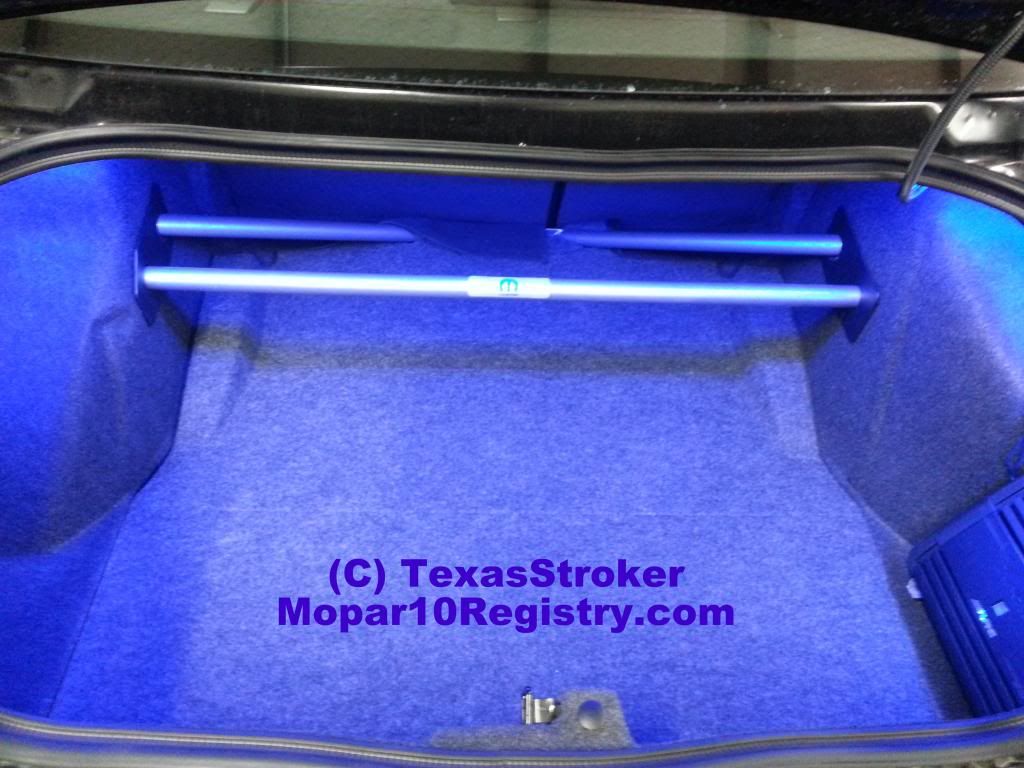
Dual Mode: Subtle Accent Lighting to Full on "Trunk of Blues"

So now, what is that "Dual Mode" I mentioned?  Well, it basically means that with the flip of one very well hidden switch I can go from full on House of Blues in the trunk, back to my traditional, and more subtle Blue LED Trunk Light Bulb and Amp Accent Light.

However, now that I have seen the House of Blues in my trunk, I really like it...Basically what that means to you is I wasted 40 minutes of electrical work in a horribly uncomfortable position to wire in a switch I don't really need....That's how life goes.

But, being optimistic and not wanting to fully admit I made a bad decision on the switch, I will likely rotate...In the summer when I run errands I won't have to have the full glow.  In the winter months when 7 PM is pitch black, it will come in might handy...and no doubt spark a few more conversations.

Not only does this look AWESOME, it is super functional...you could drop 12 Smurfs in the trunk now and spot them all in no time.  The other perk may not seem as obvious...

Increased Functionality and Practicality 

Think of when you have the spare tire cover up (if you've never done it...go out to your garage, pop the trunk, turn the lights out, and then lift it up)...see how it blocks almost all of the flipping factory illumination?  Not that you'd need it shining on a locked spare or that space saver kit to see things well on the side of the road at night after a flat tire.  The good news, if you have any bodies in the trunk and they are on the cab side of the fold in the spare tire cover, that light won't be blocked...they'll be able to see, but you better have a flashlight to get the junk out of the spare tire well...

That alone is peace of mind...I tested it (need to get a pic) and the difference is huge.  I can actually see the battery and spare tire (M10's have the actual spare tire, not the kit).

If you are not a fan of the really bright light, just remember, I can go subtle with the flip of a switch!

Conclusion (Cough, The Next Mod, Cough)

Now, talking about future mods, Phase 4 of Cloud 10 has afforded me a new direction...

Where I mounted that light to shine on the amp was okay, but I didn't like that if you were on the LH Side of the trunk, and bent just right you could see the light itself...(for anyone over 6' you'd never see it...).  When I'm in full on blue mode in the trunk, I really don't need the accent light in place THERE.

Keyword being "there."  I already tested this with my test strip and I think I might be moving the current light from an "above" position, to an "under" position.  With a little fab work for a bracket, I can mount the light under and behind the amp...This will give a nice glow not only from under the amp, but in the area behind it as well.

Overall, I am very happy with Phase 4 of Cloud 10.  Not only does it look good (and really better than I expected), I gained a lot of practicality in the trunk should I ever have to change tires at night...Plus, simply dropping the key fob into the dark trunk is no longer something to fear (I'm sure many of you can relate to that one).  While I was initially worried this might be "too much light," I am now of the mindset it is just right and further accents the blue on black theme of the M10.

When I get around to relocating the amp's accent light I'll make a new post.

Here is one more look at the Phase 4 "Trunk of Blues:"


Tuesday, January 15, 2013

2 Years of the M10!

Well, first off I apologize on not having the time to update here as much as I would like.  I've been pretty busy setting up this coming Chryslers in the Canyon V and try to make that a priority over personal stuff.

That said, I have a lot of content to post here, just need time to line it up and make it happen.

That said, today is a special day in that it was two years ago to the date that we flew down to get the Mopar 10!

The car has been great, avoided dealership's service departments thus far, and has responded well to everything I have thrown at it...I have just over 7,000 Miles on the odometer, but I actually drive mine virtually every day.

In fact, the last few days I have driven through snow flurries and light accumulations.  As stated many times, I got the car to enjoy..and that means driving it as often as possible.  Shot of icy roads or knowing of a hail storm the M10 sees nearly daily usage.

The only issue thus far (aside from being really, really disappointed with the factory stereo and speakers...which was addressed!) is that the last 2 months or so the car has started popping when backing up from work.

It seems to be an issue related to the cold and VERY common in both the Challenger and late model LX platforms, yet no one has come up with a definitive resolution.  That means that despite this being a problem on cars built since 2005 there has been no DEFINITIVE culprit identified, nor fix put on the books.

You can skim the net and find tons of threads where each different dealer acknowledges the problem (in some cases) and then attempts to fix it...Pretty much every part on the front end has been pulled and replaced in the quest to fix it and NOTHING has come back positive?!  While some cars are fixed removing a nut, others are not.

It is ridiculous.  And it really sucks to have a brand new car with only 7k miles over 2 years that has been meticulously cared for sound like you just drove through railroad tracks in a war zone when you back up.

I'm not a conventional person...I don't trust my local dealerships (especially to find a resolution to this).  I've seen it posted hundreds of times, know it is common place, and can deduce that corporate has simply not acknowledged the issue as it makes them look bad.  Well, I learned long ago you get more done, much quicker starting at the top.

I have videos of this popping and intend to upload them to YouTube, publish them to the net, and solicit others to chime in with their same problems, which remain unresolved.  If you don't want to address it on your own and do the right thing identifying the problem AND the corrective measure, I will dang sure do my part to encourage you to do so.

All that aside, overall I could not be happier with the car and it has served me well in both meeting new people, getting to attend regional events with greater ease, and just having a lot of fun.

Happy Anniversary Mopar 10!

Monday, October 1, 2012

Razor's Edge Dual Gauge Pillar Pod

Well, Phase II of my Fall 2012 upgrades is complete...and looks fantastic!  It is kind of a joint operation, but to keep things tidy I'm breaking it down into two segments. You can't really have one without out the other, but this had to be installed prior to the "functional" end of the equation.  Let me elaborate...

For those of you that have followed along, you likely recall how I have mourned not having EVIC from the factory.  Discounting the performance meter, getting readings on degrees F instead of the alphabetical C and H for temps, and a number of other parameters I would love to monitor has been a hard pill to swallow.  My biggest, and most valid, complaint has remained steady: oil pressure.

I know there is a "warning" light in the dash.  That doesn't cut it for me.  Coming from a background with old Mopars, oil pressure is the MOST CRITICAL vital to monitor and it genuinely bothers me not knowing what it is (even though I can assume it is "safe" with the warning light not on).  I am the type that wants to see 50+ PSI on a cold start, 20s at idle, and see how it fluctuates in heat and under heavy acceleration.

Without oil pressure, nothing else really matters.  I'll cover that more in the next segment for this upgrade, but let's get down to business.  Without EVIC you need an extra gauge to monitor oil pressure.

This is where things get complicated.  Where do you mount the gauge?  Certainly the chrome cup on the cowl is not what I have in mind for the Mopar 10....although if this was a 70 Challenger I might go that route.

A recent introduction is the "air vent pod."  This basically plugs in place of your LH Dash Vent and has the louvers around a 2 1/6" Gauge Pod.  Uh, no thanks.  This isn't horrible (and we know the gauge would stay cool in the summer, lol), but this is just too mustang for me.  Just how I still associate the "flowmaster sound" with fox-bodies and chevy trucks, I can't imagine liking this set-up.

A better option is the overhead console pod.  You can source single or dual gauge pods to plug in place of the "Sunglass Holder" in your overhead console.  I like this better than the vent pod, but it isn't my style.  This route is not playing into my driving style, nor my curiosity and desire to monitor engine parameters past what the factory gave us (fuel, mph, rpm, and C-H).  The big perk for those that do like this route is you are not loosing out on much.  Unless you wear prescription lenses while driving, the "sunglass holder" probably will never house anything.  Straws, chap stick, a pen...I don't know what you might do with it, but for me it is just  a flip down compartment my sunglasses don't fit in...If you use the glass holder, you probably don't want to pull it and replace it with a gauge pod.  If you don't need it and like that location you can have a single or dual gauge pod take its place.  If you want to go that route, check out this article where Brian from the Mopar 10 Registry installed one in his Challenger: )

The next option is a dash pod.  I'll be honest here and say this isn't a horrible option, but how you mount it is.  Not many of us are gun-ho on cutting a hole in the dash to run wires and cinch down a gauge pod.  This also reminds me of mustangs, but more so the 94-04 era.  I've seen several people go this route and report back they were upset that it didn't "seal" to the dash.  Take something objectionable to begin with and sprinkle in some poor fitment and you've got a pass on my end.

The last remaining option is to go with an A-pillar setup.  That is just what I chose for the Mopar 10.

The A-Pillar is the best looking option in my opinion, is the most versatile, and perhaps most importantly it fits my driving style the best.  I spend most of my time looking out the windshield so having gauges displayed on the A-Pillar just makes sense.

When I say it is the most versatile I mean it.  The Dash Vent is limited to a single gauge (I guess if you want to get weird and run info thru a passenger you could mount 4 of them), the overhead console is limited to 2 maximum, and I believe the dash pod is limited to 2 as well.

If you really have a lot to monitor you can add 3 gauges by way of the Triple Gauge Pillar Pod.

Mopar had orginally planned to launch this as part of their performance catalog of parts for the Challenger.  I've been told they scrapped it when the air bag became an issue.  Fortunately for all of us looking to add gauges, Razors Edge stepped up to the plate and delivered!

{Enter the content you have been waiting for!}

Razor's Edge saw the need for this product and worked around the "air bag" issue by using factory A-pillars.  These factory pieces are ordered in, drilled for wiring, modified with glass gauge pods, and then wrapped in black grill clothe that closely resembles both the headliner and in my opinion door pockets.

Being a factory piece, these are of great quality.  Razor's Edge grafts the gauge pods on at a very friendly orientation to the driver.  From certain angles you would be hard pressed to know the gauges were even on the A-Pillar...it makes for a very clean installation.

I know what some of you are thinking...black?  They used black grill cloth?  Isn't the factory piece gray?  Fear not for you are correct.  I actually like the factory color, that said your concern is likely not because you fear the contrast between the A-Pillar and dash ,but rather have concern over the OTHER A-pillar.

I will say this...I honestly think that short of having someone critique your car, or driving around with someone that likes to talk about funerals, famine, and disease on your way to a football game and concert, no one would notice.  If you are particular, it might bother you.  If you're in the shade, or a parking garage...good luck telling the difference in the stock piece and the modified pillar.  Now that said, if you are out in full sun it would be a bit more noticeable, but this isn't a huge contrast.

That said, if you are like me, just knowing it was different might cost you some sleep at night, so once again Razor's Edge came through with a great piece.  To remedy this scenario they ordered in a factory RH A-Pillar and simply glue black grill cloth over it.  Chrysler must love this shop...

The result is a perfectly matched pair!  You can now add gauges and keep the interior show worthy while silencing critics.

These are high quality pieces that are reasonably prices and coupled with gauges, give you a whole new experience in the cockpit.

Let's take a look at the product and install:

VIDEO COMING SOON!!

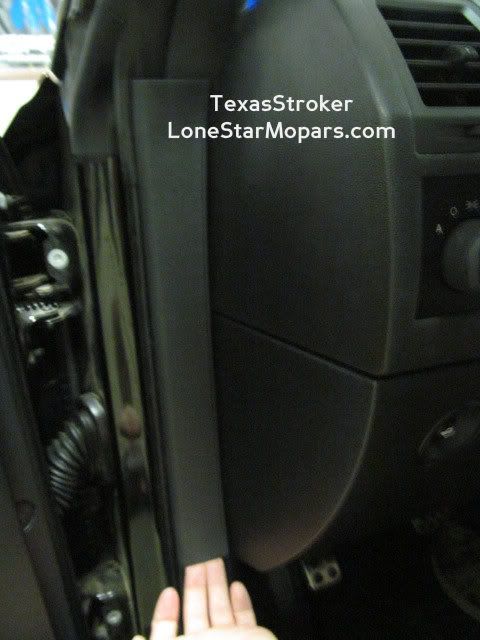
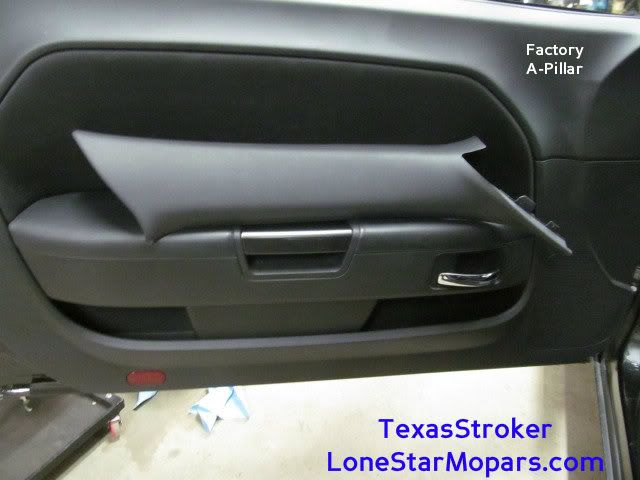
Factory A-Pillar Removal (Same for both sides)

1. Disconnect the Negative Terminal from Your Battery

I don't think you'd have an airbag issue, but it is better to err on the side of caution as it is easy to slip and trip something.

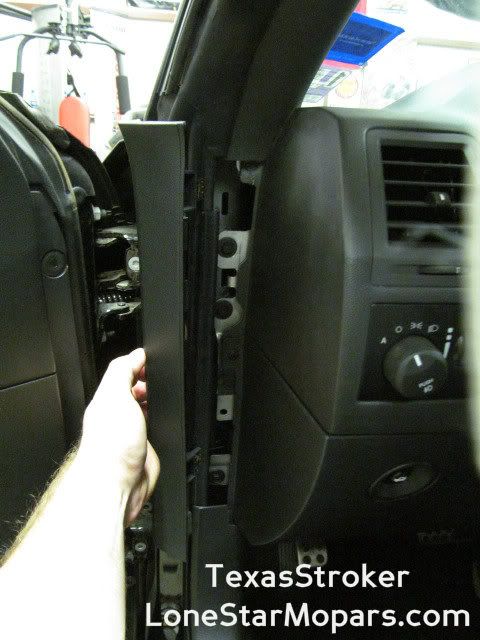
2. Lift up on the trim piece between the Kick Panel and A-Pillar

I like to start at the bottom.  There are two clips, the top is in a bit more securely.


You can see the clips/slots here:


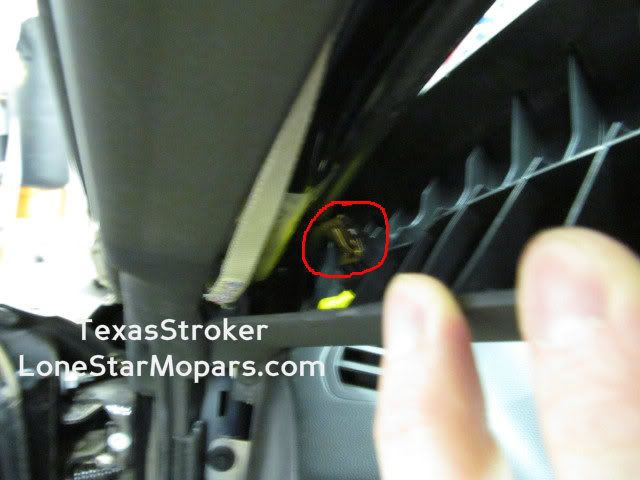
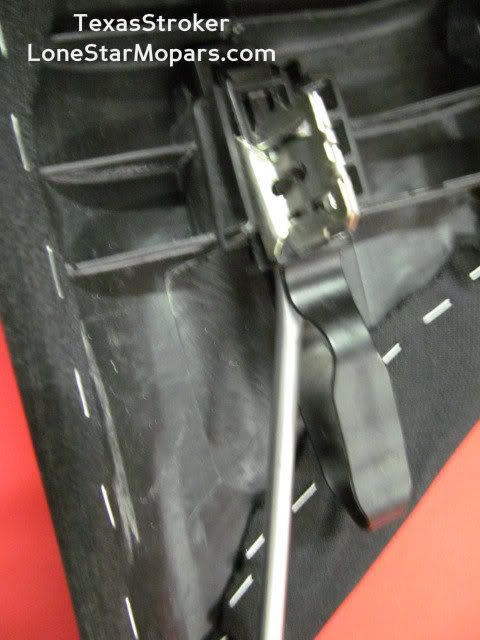
3. Now Grab the A-Pillar near the top at the headliner and shimmy it loose.  You will likely have the plastic pin (seen below) pop and the metal clip remain in the car.  If you can reach it, push in the plastic detent and slide it to the middle, then depress it again and free it from the metal clip.

If you can not reach the plastic detent, simply pull outward to release the bottom clip and then release the top clip as described above:


4.  Simply lift the locators (plastic tabs at the bottom of the A-Pillar) away from their recesses in the dash and the A-Pillar is out.  You aren't looking at but about 5 minutes to do this process on both sides.

Now let's prepare to install the Razor's Edge A-Pillars.

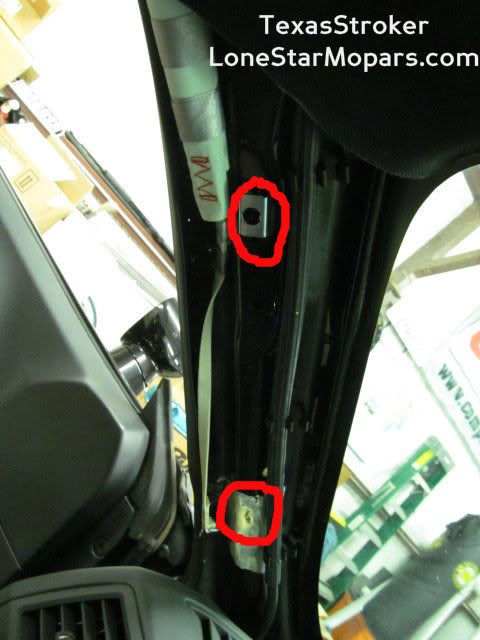
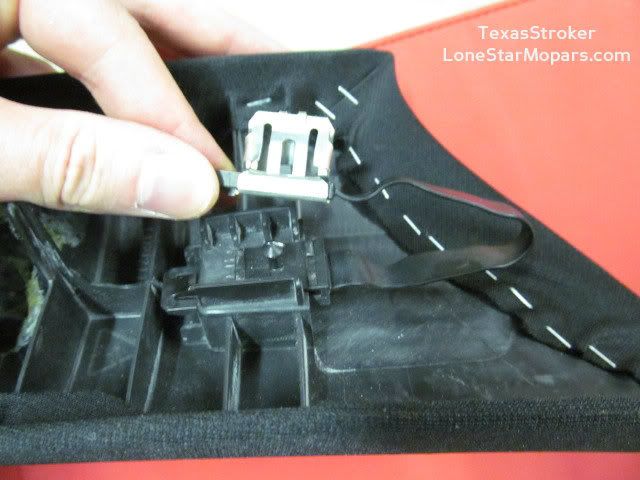
*This is a big tip from my install.  Instead of trying to get the metal clip out of the body of the car, leave it in place!  We can simply remove the same clip from the Razor's Edge A-Pillars and then use the factory clip to secure the new A-Pillars.

The metal clip I am referring to is the top circle in the picture below.  The bottom circle is where the other clip is snapped in place:


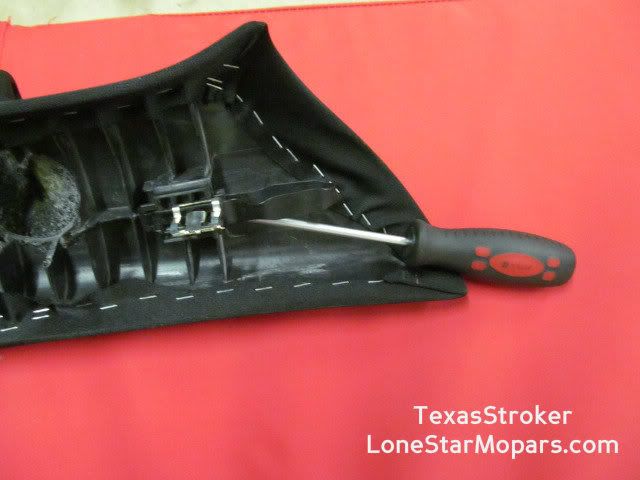
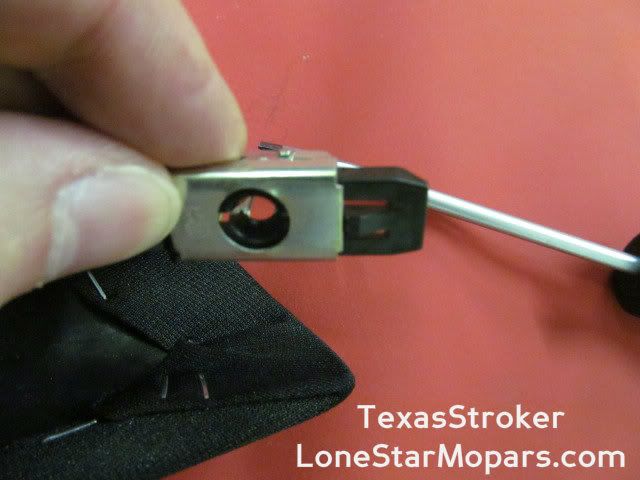
1. Place the A-Pillar on a soft surface and source a flat blade screwdriver or pry tool.  The clip doesn't require enough pressure to have the screwdriver mar the plastic:


2. In fact, it requires no leverage!  Simply slide the flat end forward and the plastic pin will be released from the clip:


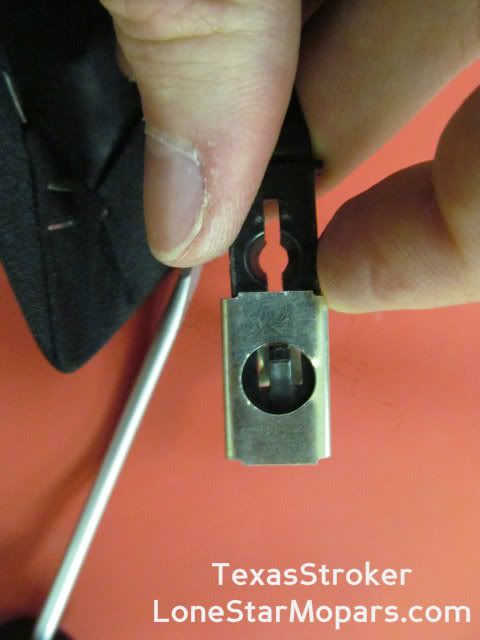
3.  Now we just need to remove the metal clip from the plastic tab.  We are going to reuse the metal clips that we left in the car.  Trust me, this is the best way to do things.  It will save you a lot of time.


That piece of plastic that raises up is what I call the "detent."  It looks similar to what you see on electrical connectors that clip together.  Simply press down on it and push it towards the center of the metal clip:


See how the tab moved?  Depress the plastic detent again and you will free the plastic portion from the metal clip.  That is all there is to it.

Keep the metal clip and reinstall it on the factory A-Pillars when you have them removed...This will ensure you do not loose it...and if you do, you have a bigger problem anyway.

Now, you are ready to install the Razor's Edge A-Pillar Gauge Pod and/or Matching Passenger Cover.

1.  Slide the plastic tab with the detent into the metal clip you left in the car.  Make sure to insert it all the way (ie the first click will be when you hit the center of the clip and the second will be fully installed).  After that, line up the bottom tabs of the A-Pillar with their respective recesses in the dash.

2.  Use the locating pin on the A-Pillar (large plastic dowel) and find the hole for it near the metal clip.

3.  Get it in place and proceed to press the ball end of the of the plastic hanger into the plastic tab + metal clip combo.  No good way to explain that in writing...

4.  You should now have the A-Pillar snug up top...Slide down the side and make sure to get the rubber trim on the window side on top of the A-Pillar.  This will help you snap the lower pin in place much easier.

5.  Now apply firm pressure along the area where the bottom clip is...When you hear it pop, you are pretty well done.

6.  Apply pressure all the way along the A-Pillar and make sure it is snug, just like the factory piece.  Double check to make sure the bottom end is recessed in the dash and that you have the top end over the headliner. Lastly, make sure the rubber is overlapping the A-Pillar and your install is complete.

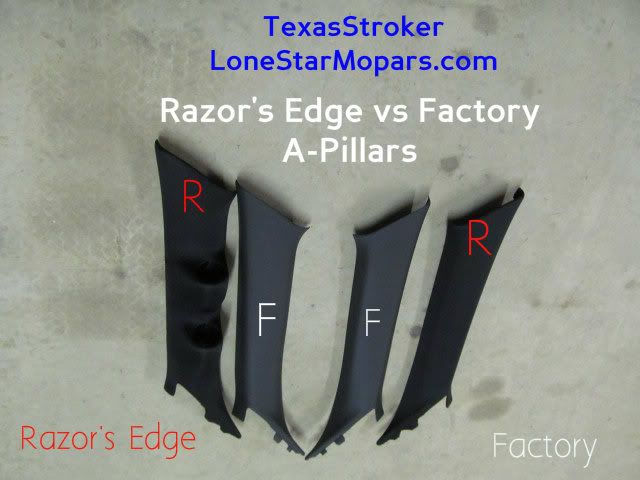
If you have read all that and don't actually have the A-Pillars from Razor's Edge, I assume that is because you are still debating this upgrade, or can't believe someone did all this without providing a nice color comparison.  Fear not...I am with you 100%.  For those of you concerned with the color change, here you go:


Left to Right: Razor's Edge LH Dual Gauge Pillar Pod, Factory LH, Factory RH, Razor's Edge RH

Kind of sloppy, but you get the idea.  The red "R" indicates a Razor's Edge piece while the white "F" indicates the Factory A-Pillar.

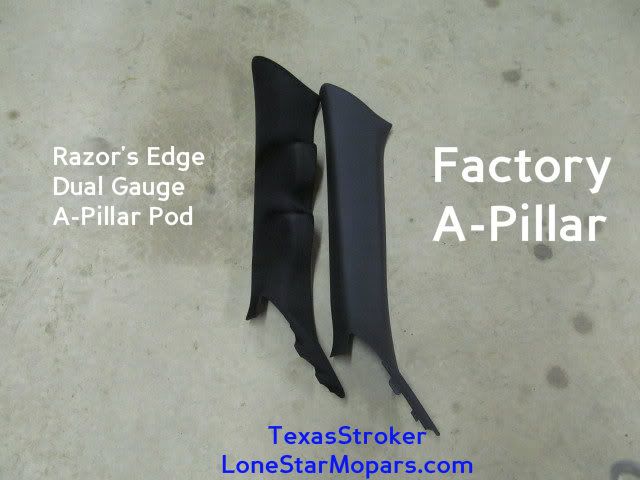
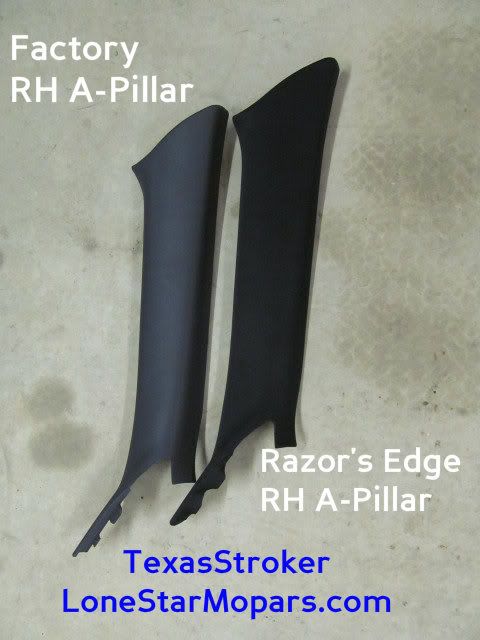
More detail you say?  No problem:


This is just as the captions indicate...Modified Razor's Edge Dual Gauge Pillar Pod beside the Factory LH A-Pillar.


Again, pretty straight forward.  To the left we have the factory RH A-Pillar and on the right we have the "matched" Razor's Edge RH A-Pillar.

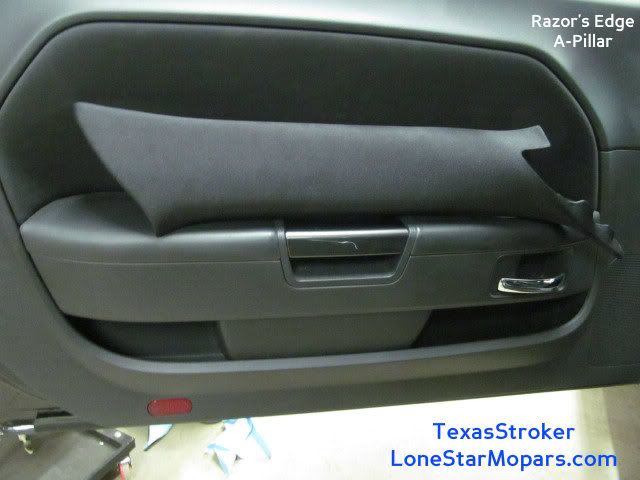
What?  You care so much about your late model Mopar you want to see how they look with the car?  As you wish:


I felt like the door actually gave the best showcase for hte color change.  To me the factory A-Pillar is more like the plastic you see on the door panel (top piece with lock know and lower half with speaker grille).  The door's inset area is kind of a darker color than the slate gray in my opinion and I think the Razor's Edge pieces matches it better.


You should see more contrast between the factory A-Pillar and the door's inset than you did with the Razor's Edge Piece.  Alternatively, the factory A-Pillar is dead on with the plastic on the door.

Going with the side-by-side comparison photos from earlier, it is easy to see that the Razor's Edge A-Pillars and the black grill clothe are in deed darker.  But here is the catch...

Factory A-Pillar=Matches Plastic Door Panel and Dash

Razor's Edge A-Pillar=Matches Door Inset and Headliner

Take your pick as neither is 100% uniform.

I've said it before and I'll say it again.  With the Challenger's interior being so dark, you honestly can not tell the difference in the stock A-Pillar and the Razor's Edge A-Pillars in overcast conditions, a shop, a parking garage, under a shade tree etc.

In full sun with the sunroof open, yeah...you probably can.

I truly believe you could run the modified LH Pillar for gauges and keep the stock RH Pillar and never get caught...unless you are dealing with someone who is nitpicking your entire car.  That said, I sprung for the matching passenger side and couldn't be happier.

The installation of the Razor's Edge Dual Gauge Pillar Pod and Matching Passenger A-Pillar was truly painless and took only a few minutes.  The placement of the gauges and viewing angle is perfect for me and when combined with gauges, it makes for a total interior transformation.

The Gauge Pods are integrated so smoothly, only the most keen eyes will notice this upgrade.  Those looking enough to notice it are probably wanting to do the same.

If you have an eye for mods, you can see the gauges from both windows and trained eyes can catch the telling bulge from a front vantage.

At night the glow from the gauges serves as a warning sign to would be contenders that they are dealing with a modified Mopar and should think twice before getting embarrassed.

All-in-all, if you have the need for gauges, this is the way to go in my opinion.  It is a slick install and blends custom and function flawlessly.

You can pick up your Razor's Edge A-Pillar Gauge Pods and the Matching Passenger Side Cover here:
http://www.razorsedgemotorsports.com/category_s/220.htm

Wednesday, September 19, 2012

More for the M10!

Well, despite not getting to fully "catch up" on recapping some of the recent upgrades to the M10, I finally got the time to pull the trigger on some stuff I've wanted to add for a LONG time.

I got most of the parts ordered late Monday, September 17th, 2012 and the last few pieces very early Tuesday morning.  If not for "online" store fronts, I don't know if I'd have ever gotten the stuff ordered.

The parts ordered in this time are definitely more performance oriented than what I've done up to this point.

That should give you a fairly good idea of what is likely coming...I won't go into it in full until the parts are on and the install is documented, but let's just say the car should "wake up" a bit, have a bark to it, and speak more to me.

If you can make sense of that, post up in a reply.  I'l mention you in one of the write-ups!

Thanks to various shipping locations, I will actually get the first part in tomorrow afternoon (barring a massive UPS failure).  Most everything else is currently slated for Monday, September 24th, 2012 and the stuff I ordered early Tuesday (9/18) should arrive in the afternoon on Tuesday, September 25th, 2012.

I'm pretty excited about it.

Naturally what I planned to install first, will be here the latest, but oh well.  I can go right to work with what comes in tomorrow.  Might even have some info on that this weekend!

Monday, September 10, 2012

Mopar 10 with the 2012 SRT Tour


Amarillo Area Mopars was fortunate enough to be slated as one of the stops on the 2012 SRT Tour.  We caught Monday, September 10th, 2012 6 PM on the tour schedule and as fate would have it had a very nice day, minus the typical wind.    I opted to take the Mopar 10, which is why you are reading this...Scroll all the way down for some bonus M10 stuff.


Aerial Group Shot:

Image

Video:

The 2012 SRT Tour is a cross country trip put on by the folks at SRT to showcase the 2012 line-up of, you guessed it, SRT vehicles.  The Tour features the 300C, Jeep Grand Cherokee, Charger, and Challenger.  Four drivers: Jennifer, John, Rachel, and Sean were given the daunting (cough, sarcasm, cough) task of piloting these factory fresh SRTs across the great American landscape and show them off to enthusiasts and garner attention of would be converts from brand-x platforms, or as I like to call them pieces of shit.  

Driving the highways of American in a string of HEMI powered SRTs is a great way to make mustangs and camaros sweat as some 1500+ HP rolls by in the fast lane.  Before any green folks panic about the impact on the environment, you'll be glad to know that every car was well over 20 MPG, despite lots of heavy traffic and construction.  See if your camry can pull that off while maintaining the smug mediocrity that is life in an under-powered car that barely boasts any more gains in fuel economy.  Some people still like to push that pedal on the right that actually makes a vehicle accelerate.  The engineering and technology under the hood of these SRTs offers insane power levels with fuel economy no one would have dared associate with such a power level just a few short years ago.

The SRT crew rolled into town and met members of Amarillo Area Mopars at the world famous Big Texan Steak Ranch.  AAM pulled out quite the showing with everything from 60s & 70s muscle cars on up to Vipers and late model Challengers.  Among the local SRT population was Kat with her Crossfire, which just happens to be the fastest SRT-6 in the world.  AAM was also glad to welcome back John, who drove all the way down from Kansas in his Green with Envy Challenger.  Later on in the evening some red touched the landscape in the form of an SRT Charger and an SRT Viper.  A couple others snaked their way in, including a Ram SRT10.

Of course, there was the usual landscape of color thanks to the AAM diehards.  Everything from a 68 Dart to 2010 Challenger R/Ts were on hand to welcome the SRT Tour.  Steve came all the way down from Borger in his Roadrunner and we had a few just miss getting to join us due to last minute issues that arose.

All-in-all it was a great night for everyone involved.  The folks at SRT got to show off the new product line, check out some great local Mopars, and got to experience the world famous Big Texan Steak Ranch!

We were honored to be among one of the stops chosen and slated on the tour and thanks goes to the folks at SRT.
The real winner however was the regular folks travelling up-and-down I-40.  There was a steady stream of curious on lookers all night.  Many walking back to their cars to pick up cell phones or cameras to capture what was yet another special evening for the folks in Amarillo Area Mopars.

We hope everyone had a great time and send our best wishes to the crew as they head off for St. Louis.  Have fun, stay safe, and thanks for including us in your travels!

And now that you've read all that, how about some more pictures?:


Color match:

Image

Group Shots:
Image
Image
Image
Image


SRT Line-up:
Image
Image
Image

Anyone catch the reason I took this picture?:
Image

SRT vs AAM:
Image

Cool shot with the Mopar 10 vs SRT:
Image
Image

Nice plug for the guests and the venue:
Image

The people that made the turnout:
Image
Image

SRT Girls with the Band:
Image

The Official SRT Tour Group Photo:
Image


Fore more info on the SRT Tour, check out the official SRT Tour Website: http://www.driversrt.com/tour


You can also find more on the AAM Network of Sites: http://www.amarilloareamopars.com

Don't forget to mark your calendars and join us for Chryslers in the Canyon IV:
http://chryslersinthecanyon.amarilloareamopars.com

And don't forget AAM is on Twitter, Facebook, and Google +

Hey, you're still reading...great.

As always, I hit up everyone I can in an attempt to get the official "Mopar 10" Spreadsheet.  None of the SRT crew were aware of the spreadsheet or had any info to offer up.

I was the last to leave and after telling them about some stuff to look for on their way to St. Louis (most notably the Largest Cross in the Western Hemisphere in Groom, which they did check out).  It also was dark in the parking lot when we were coming out.  I was talking to Hammer about exhaust tones with MDS engaged and he commented on the painted brake calipers and asked if I had done that, or if the factory did.  As I told him that was me, I sat down some posters to give out to those who attended and didn't get one.

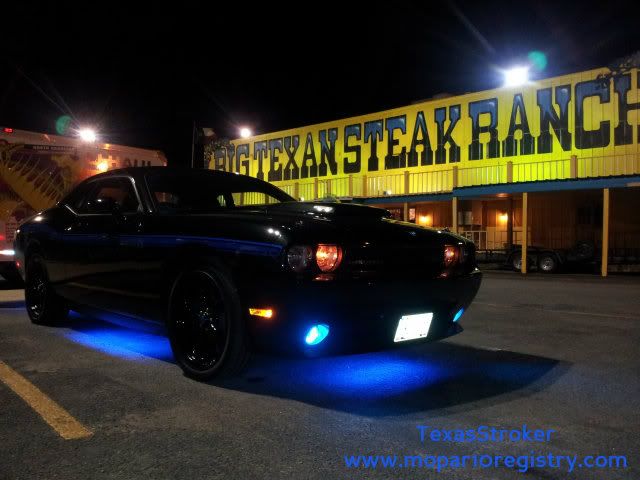
When I did that, he also noticed the blue footwell lights (ie Cloud 10 Phase 1).  Since he liked that I went ahead and flipped the switch for the underbody lights (Cloud 10, Phase II).  He really liked that.  We talked a while longer and wondered what the others were still doing in the Big Texan.

They came out and I heard Sean say to Rachel and Jennifer, "Look it's floating on a cloud!"  I told him that was ironic, since I actually dubbed it "Cloud 10."  He added, "I usually hate cars with underbody lights...but that actually looks really good!"  He went on to mention the other car he liked it on, an old ford street rod with purple underbody.

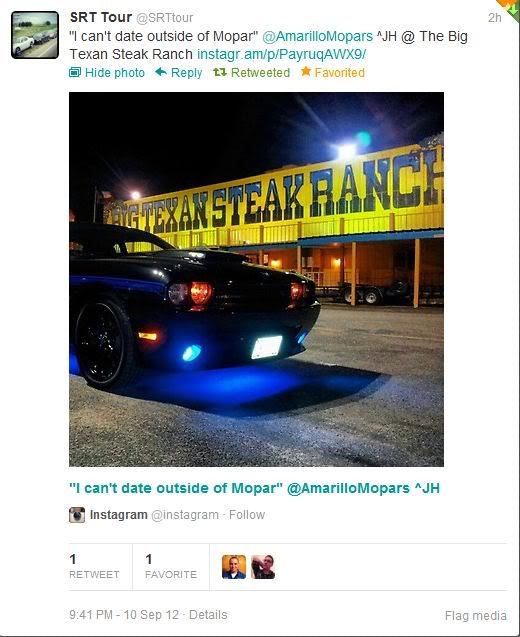
That was a nice treat for myself and the M10 as the 2012 SRT Tour drivers officially endorsed "Cloud 10."  I've said since I've done it that it isn't for everyone, but that I like it, I think it suits the car, and it just looks killer in my opinion.  I'm sure a lot of people down the road will hate it, but in all honesty, if you aren't out and I don't have the switch on no one knows it is there.  That said, for everyone that dislikes it, I think you need to see it in person before you judge.  So far, the feedback has been overwhelmingly positive.  The real highlight for the M10 was getting shot for the SRT Tour Instagram and then Tweeted!  For those scoring at home, that is 2 Tweets for the M10 from Official Dodge media outlets!

Here is the Tweet:


Here is the picture from the Tweet:


And here is the Full Size Pic John was nice enough to e-mail me: